User Guide
Welcome to CoDoc, a desktop app for students in NUS to connect with each other for the benefit of their course of study.
CoDoc is optimized for use via your Command Line Interface (CLI) while still having the benefits of a Graphical User Interface (GUI). If you can type fast, CoDoc can get your contact management tasks done faster than traditional GUI apps.
CoDoc is more than just a traditional contact management app. Save useful information such as modules taken or skills possessed by a person to greatly improve your networking experience.
Spend less time keeping track of your contacts or searching through chats, and more time making meaningful connections and accomplishing your goals!
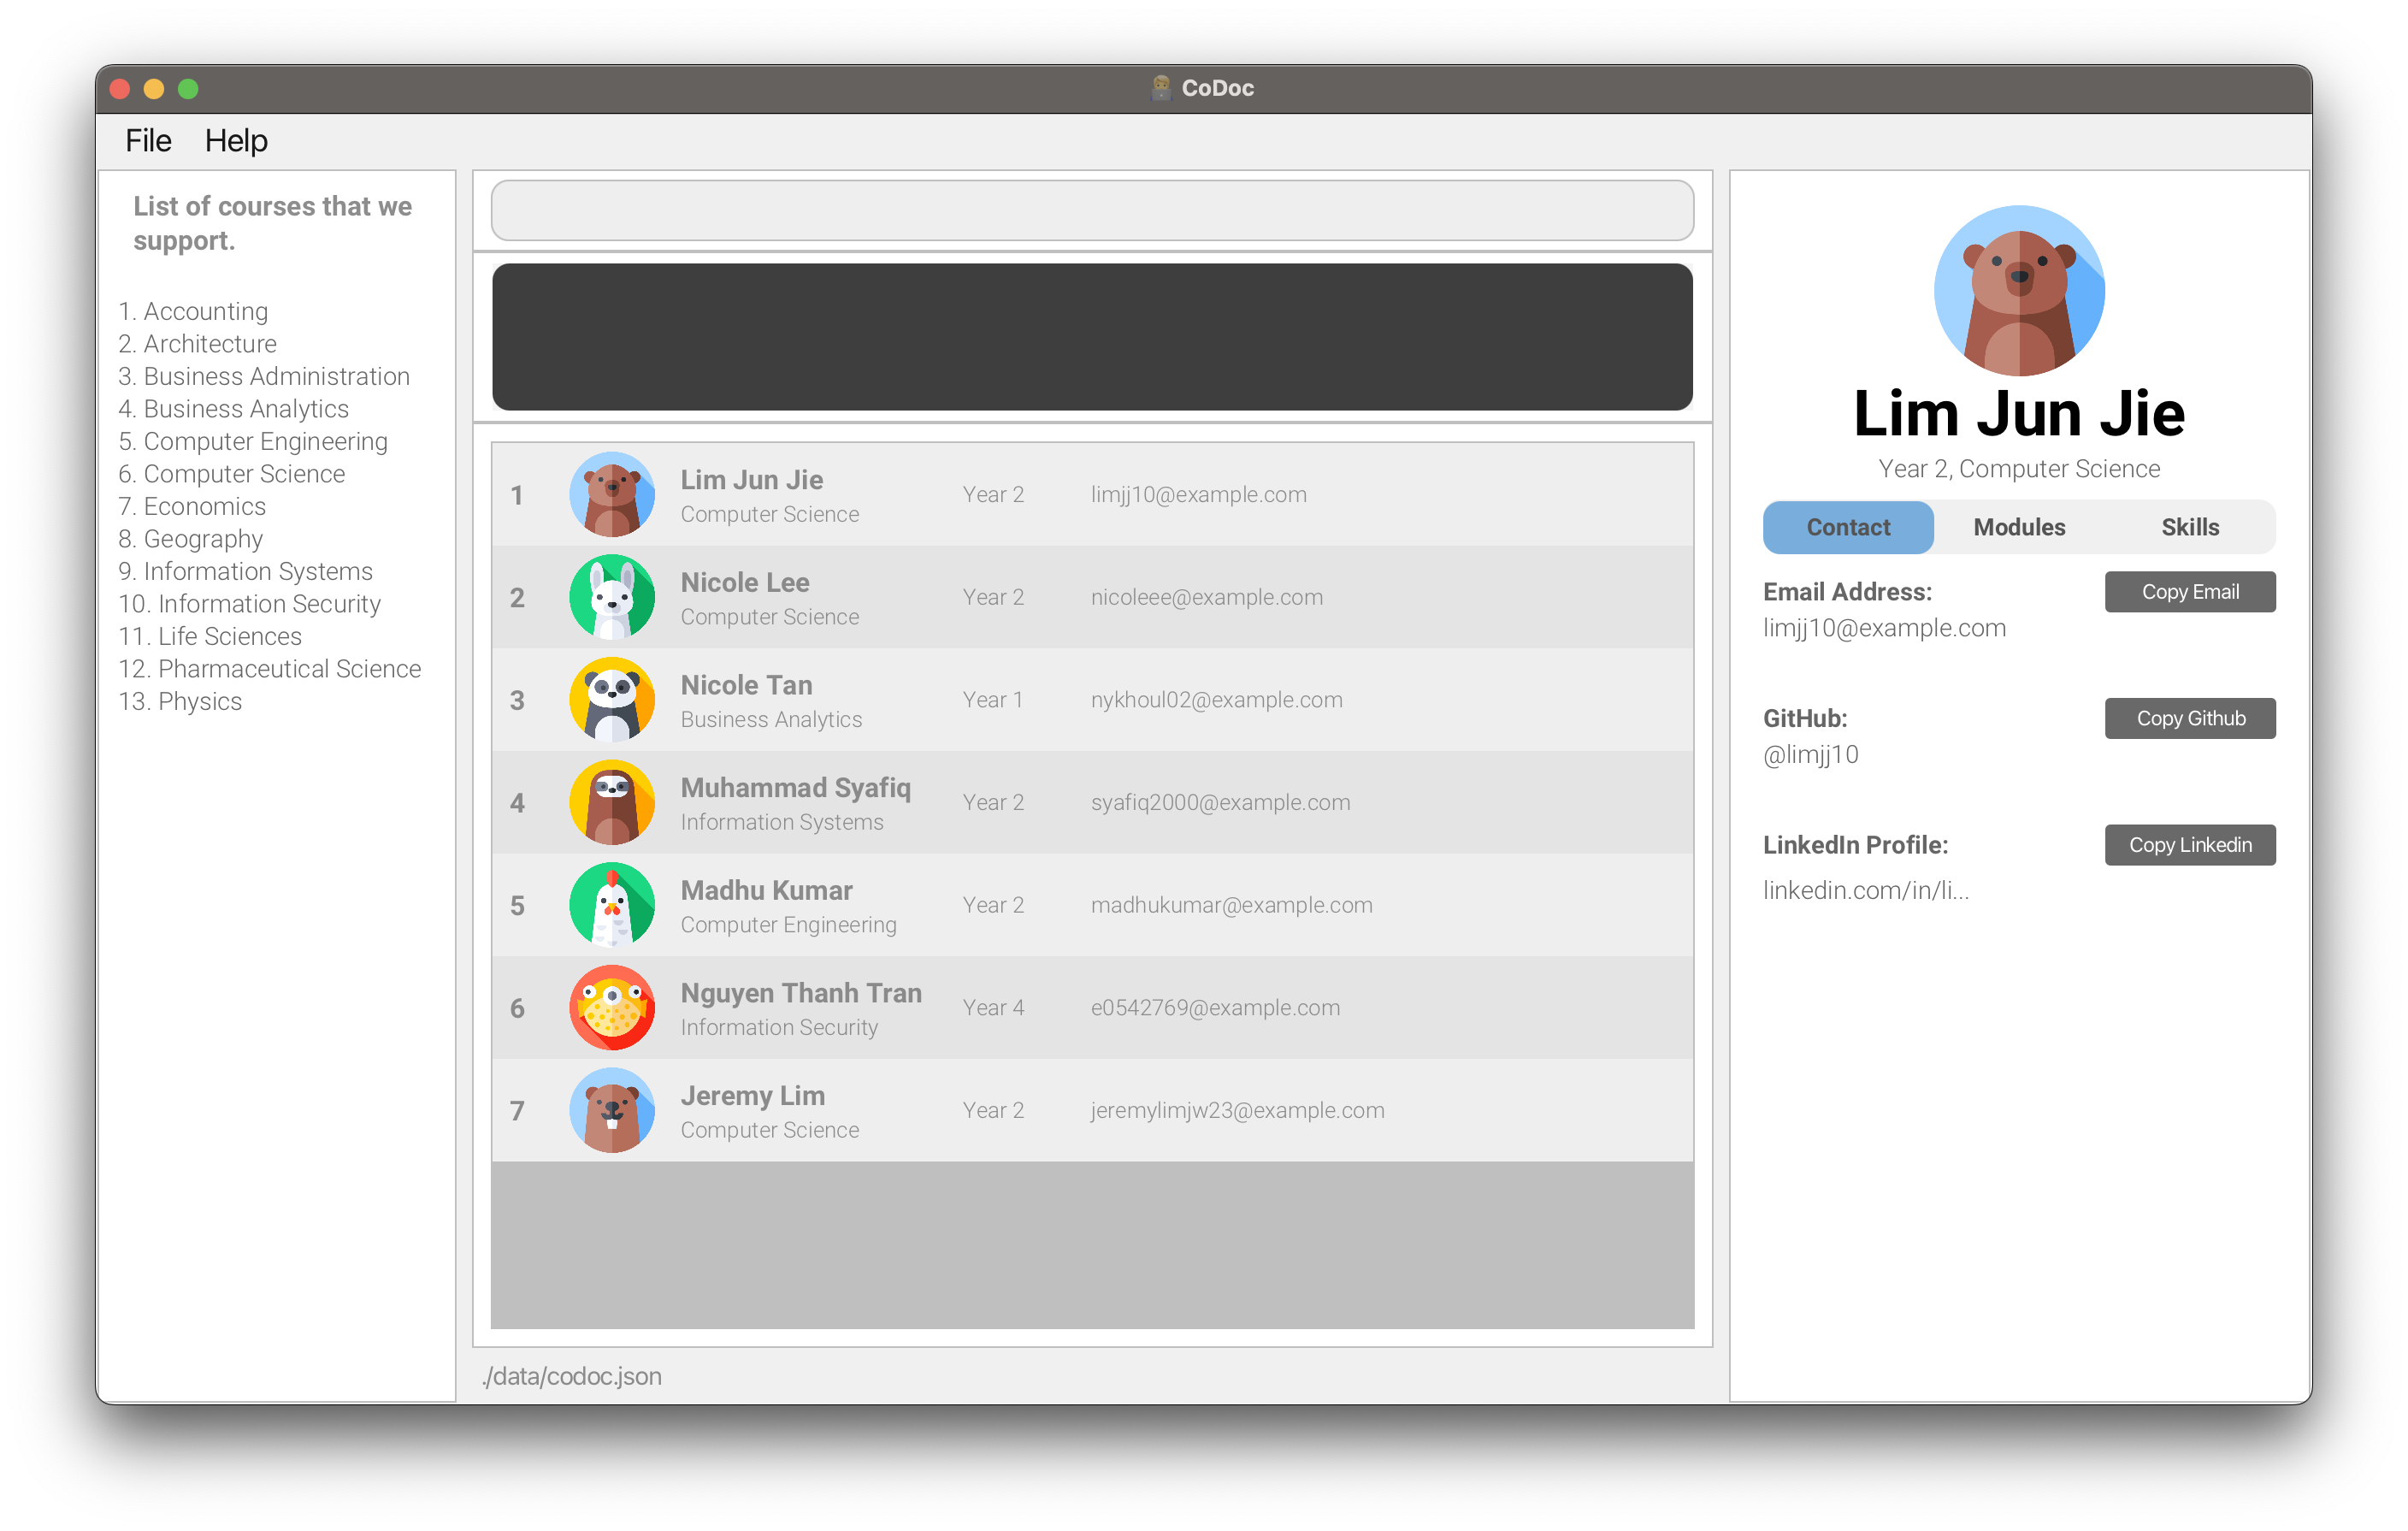
Table of Contents
- Navigating the User Guide
- Glossary
- Quick Start
- Notes about the command format
- Commands
- Data Management
- FAQ
- Upcoming Features
- Command Summary
- Additional Resources
Navigating the User Guide
Before you start using CoDoc, you are recommended to read the Glossary, Quick Start and the Notes about the command format sections, which will provide the necessary information to allow you to familiarise yourself with the structure of this User Guide and help you navigate it with ease.
If you are first time users of CoDoc, we highly recommend that you read through the entire user guide in order to become familiar with CoDoc and to gain the most out of your experience.
We have provided a quick tutorial on how to download and install CoDoc, how to make sense of the interface, as well as how to properly use each command.
If you are proficient with the command types and are looking for a quick summary of our commands, you may jump to our Command Summary that contains relevant examples.
If you are looking for a detailed explanation of each individual command, you may jump to the Commands Section. Each command is complete with:
- What the command does
- The format of the command
- Examples of the command
- Picture of the command in action
- Any additional tips or warnings
If you have questions regarding storing of information, you may proceed to our Data Management Section.
Should you have more questions, you may proceed to our FAQ. We hope it will be sufficient to clarify your doubts.
Whenever you are in doubt, forget the command formats for any feature, need help troubleshooting,
or you simply want to maximise your use of this application, do remember to revisit this User Guide.
Thank you for choosing CoDoc, and we hope you have a pleasant experience ![]()
Scroll back to Table of Contents
Glossary
| Terminology | Meaning / Purpose |
|---|---|
| Command Line Interface (CLI) | A way for users to interact with a piece of software via text in the form of commands where users enter a specific command, press "Enter" and wait for a response. |
| Graphical User Interface (GUI) | A way for users to interact with a piece of software via visual elements instead of entering commands |
| Index | An identifier that corresponds to an option. For CoDoc, index are used when selecting courses and contacts—where the index must be a positive integer 1, 2, 3, ...—or navigation of tabs—where the index can be c, m, or s. |
| Prefix |
An identifier that indicates which field our input is meant for. It is denoted by a letter or symbol followed by a slash /. E.g. n/ indicates name, c/ indicates course, m+/ indicates addition of a module, s-/ indicates deletion of a skill.
|
| Parameter | An input that you as the user, will give to the command. These can be in the form of numbers or text. Some commands take in a parameter after the prefix while some don't require a prefix at all. |
| To inform you of relevant information that might be useful to take note of as a user. | |
| To provide you with relevant suggestions on how to use the commands as well as address potential confusions when using these commands. | |
| To inform you of some unintended or unexpected consequences that may occur when you use the commands. |
Scroll back to Table of Contents
Quick Start
First time using CoDoc? Welcome aboard! Follow the steps below to familiarize yourself with CoDoc.
Download and Installation
Before you can use CoDoc, you need to download it. To do this, follow these steps:
- Ensure you have
Java 11or above installed in your Computer.- If not, you can download it from here
-
Download the latest version of
codoc.jarhere, where you will be redirected to our GitHub Releases page. Find the latest release and download the latest version.
- Copy the file to the folder you want to use as the home folder for CoDoc.
For example,- Create a new folder where you want CoDoc to be (Desktop, My Documents…anywhere you wish)—this folder will then be the home folder.
- Place
codoc.jarinto the newly created folder.
-
Launch CoDoc.
- For users familiar with command terminal:
-
cdinto the folder you put the jar file in (home folder). -
java -jar codoc.jarto launch the application. - CoDoc should launch in a few seconds.
-
- For Windows users who prefer clicking in folder to launch:
- Create a .bat file in the folder you put the jar file in (home folder).
- Write
java -jar codoc.jarinto the .bat file. - Click on the .bat file and CoDoc should launch in a few seconds.
For a more detailed guide with examples, refer to How to Open CoDoc For Windows or How to Open CoDoc For Mac
- For users familiar with command terminal:
If you have managed to complete all steps, congratulations! You should be seeing CoDoc application launched in its factory state as shown below.
Scroll back to Table of Contents
Navigating CoDoc
If it’s your first time using this program, the starting screen could seem a little overwhelming. Not to worry, let’s familiarize ourselves with the different parts of the CoDoc interface together. We recommend maximizing the program window to have a clearer view. This way you can see more content as well.
Below is the breakdown of the CoDoc screen:
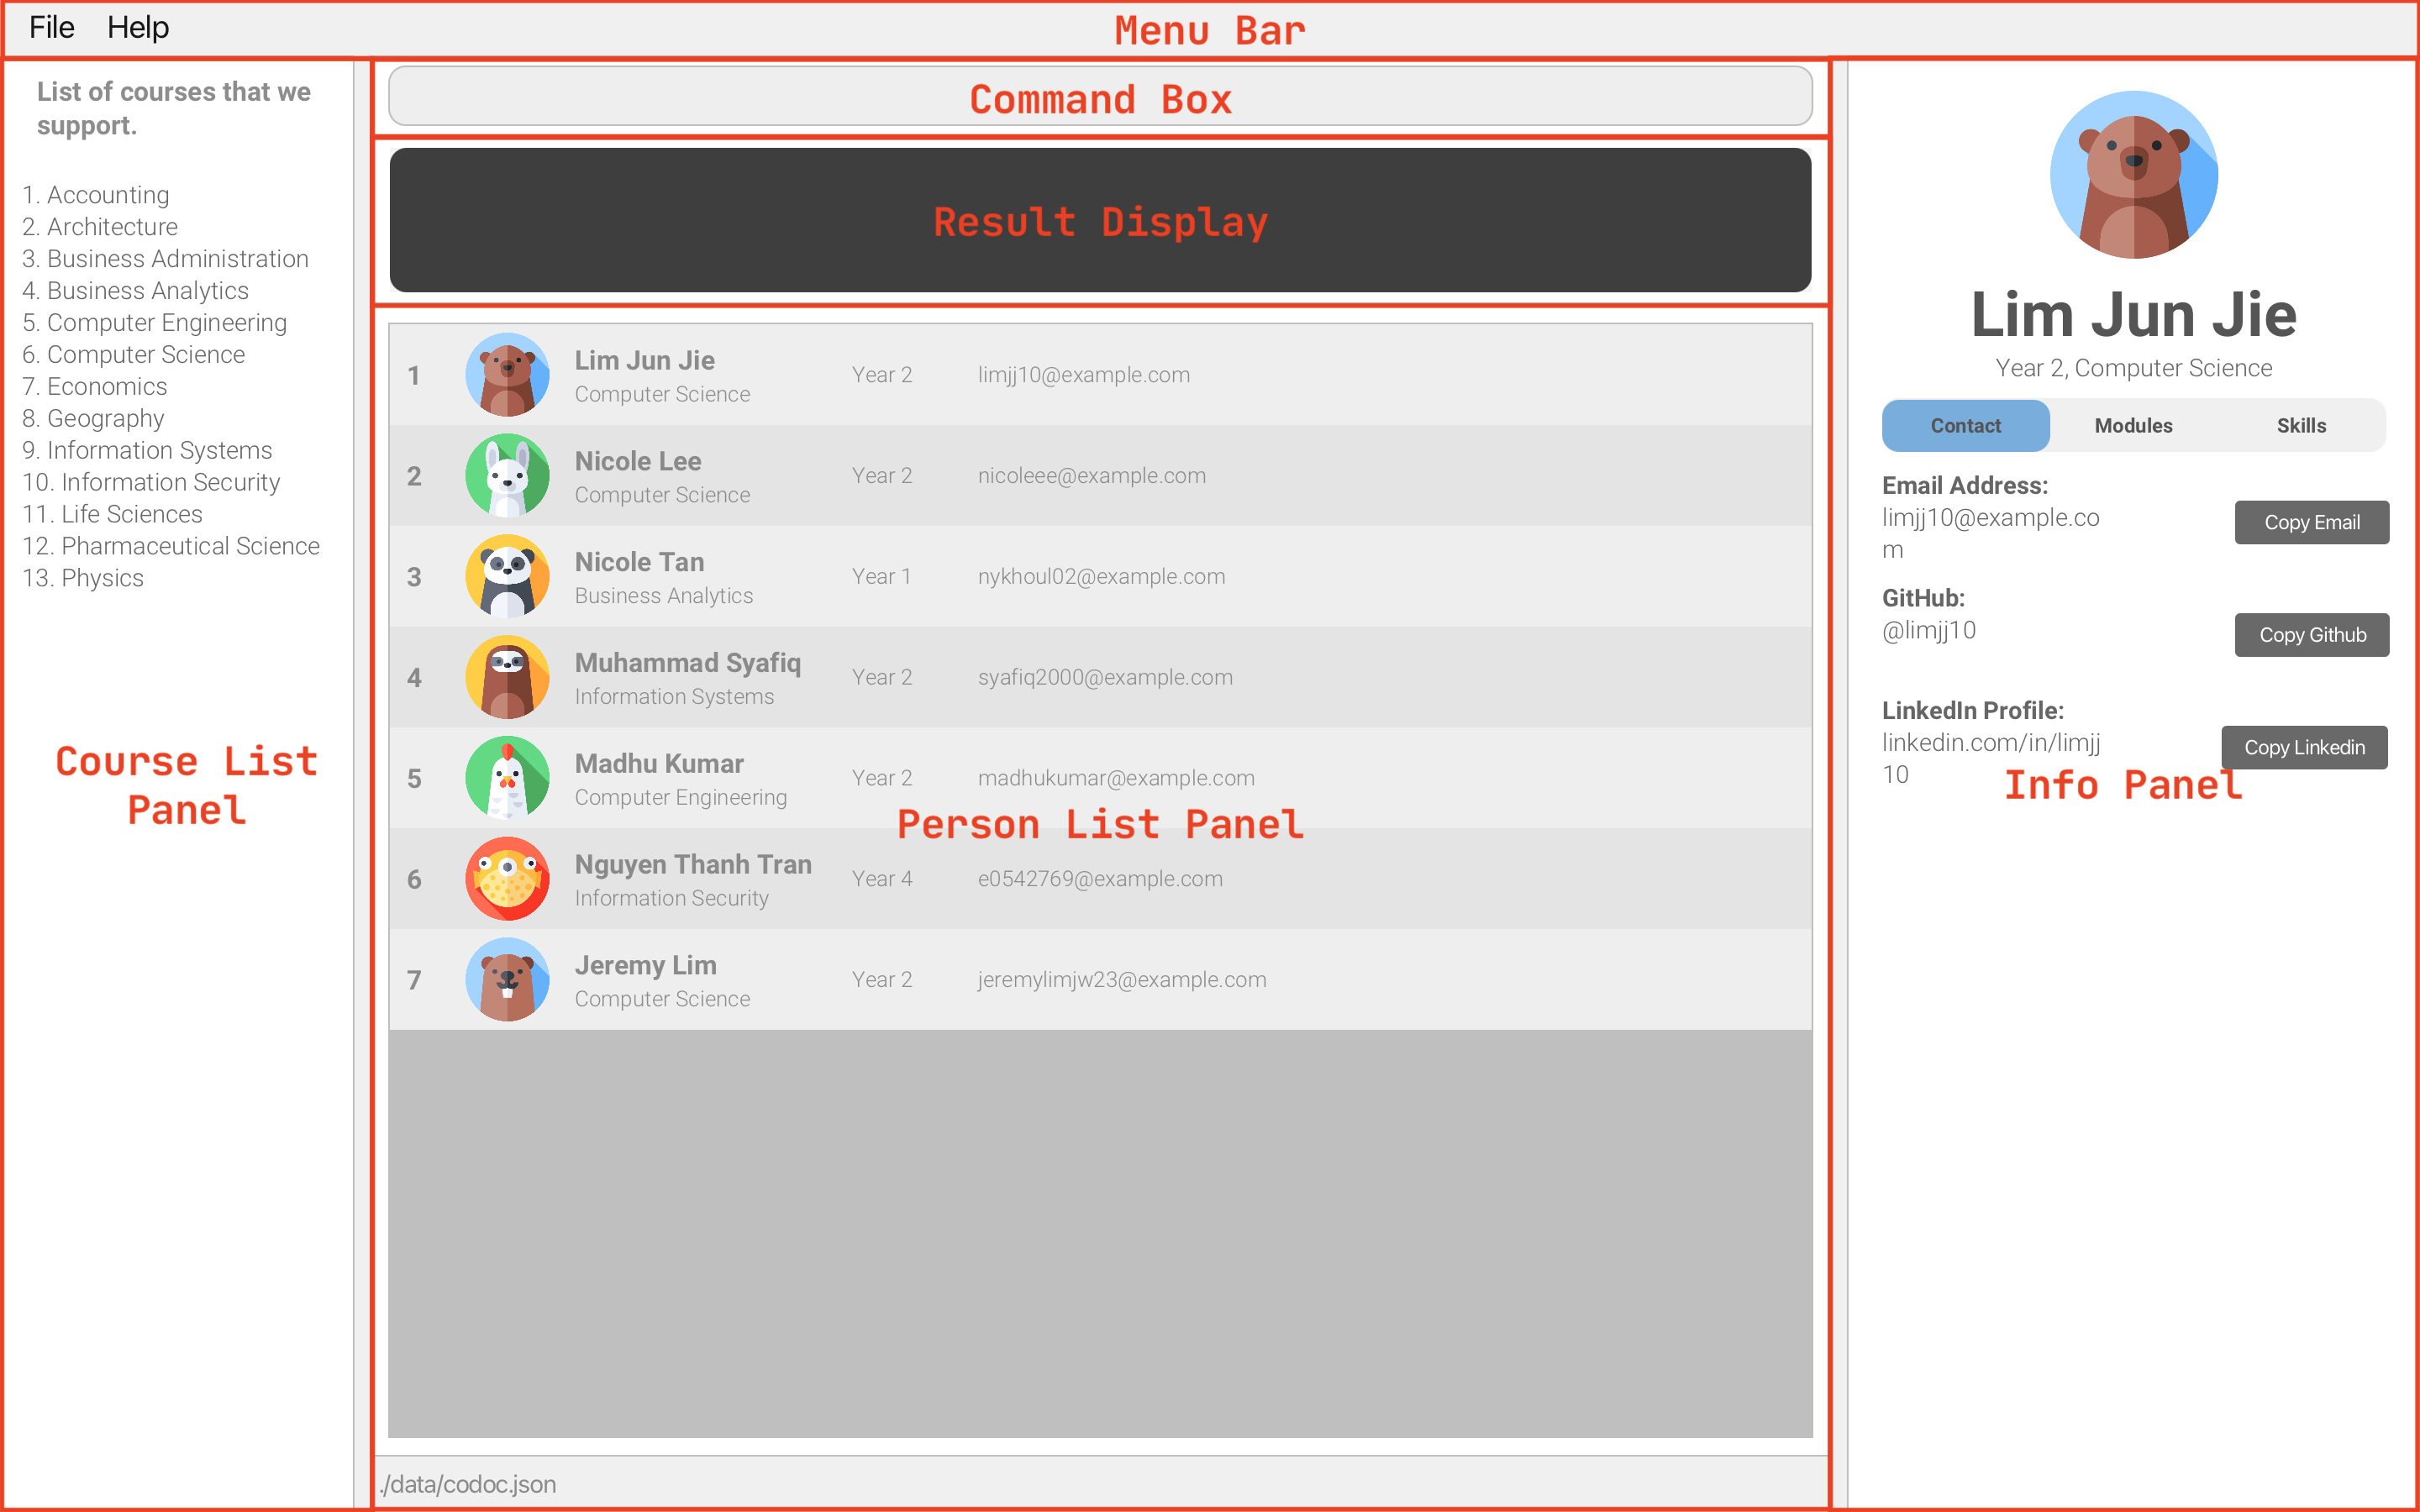
-
Menu Bar: if you ever feel stuck, you can always click on the
Helpbutton here or enterhelpin the command box. - Command Box: this is where you can type in commands.
- Result Display: shows the result of a command that you have executed.
- Person List Panel: here are your contacts in CoDoc.
- Course List Panel: you can refer to this list when adding a person.
- Info Panel: displays information about a selected person, such as their contact details, modules, and skills, which are presented as tabs.
Scroll back to Table of Contents
CoDoc Tutorial: Your first steps
Now that you know how to navigate CoDoc, we recommend you try the following steps to familiarize with available features of CoDoc.
1. Adding a person
You probably notice a list of contacts already into the database. How can I add one on my own?
Let’s say you got to know Bob in school and want to add him to CoDoc. You find out that Bob, is a year 2 student, taking Computer Science and his email address is e0823741@u.nus.edu. Here is how you can use CoDoc’s Add command to do so:
In the command box, enter the command add n/Bob y/2 c/6 e/e0823741@u.nus.edu and press the enter key.
This will add a new person named Bob to our contact list.
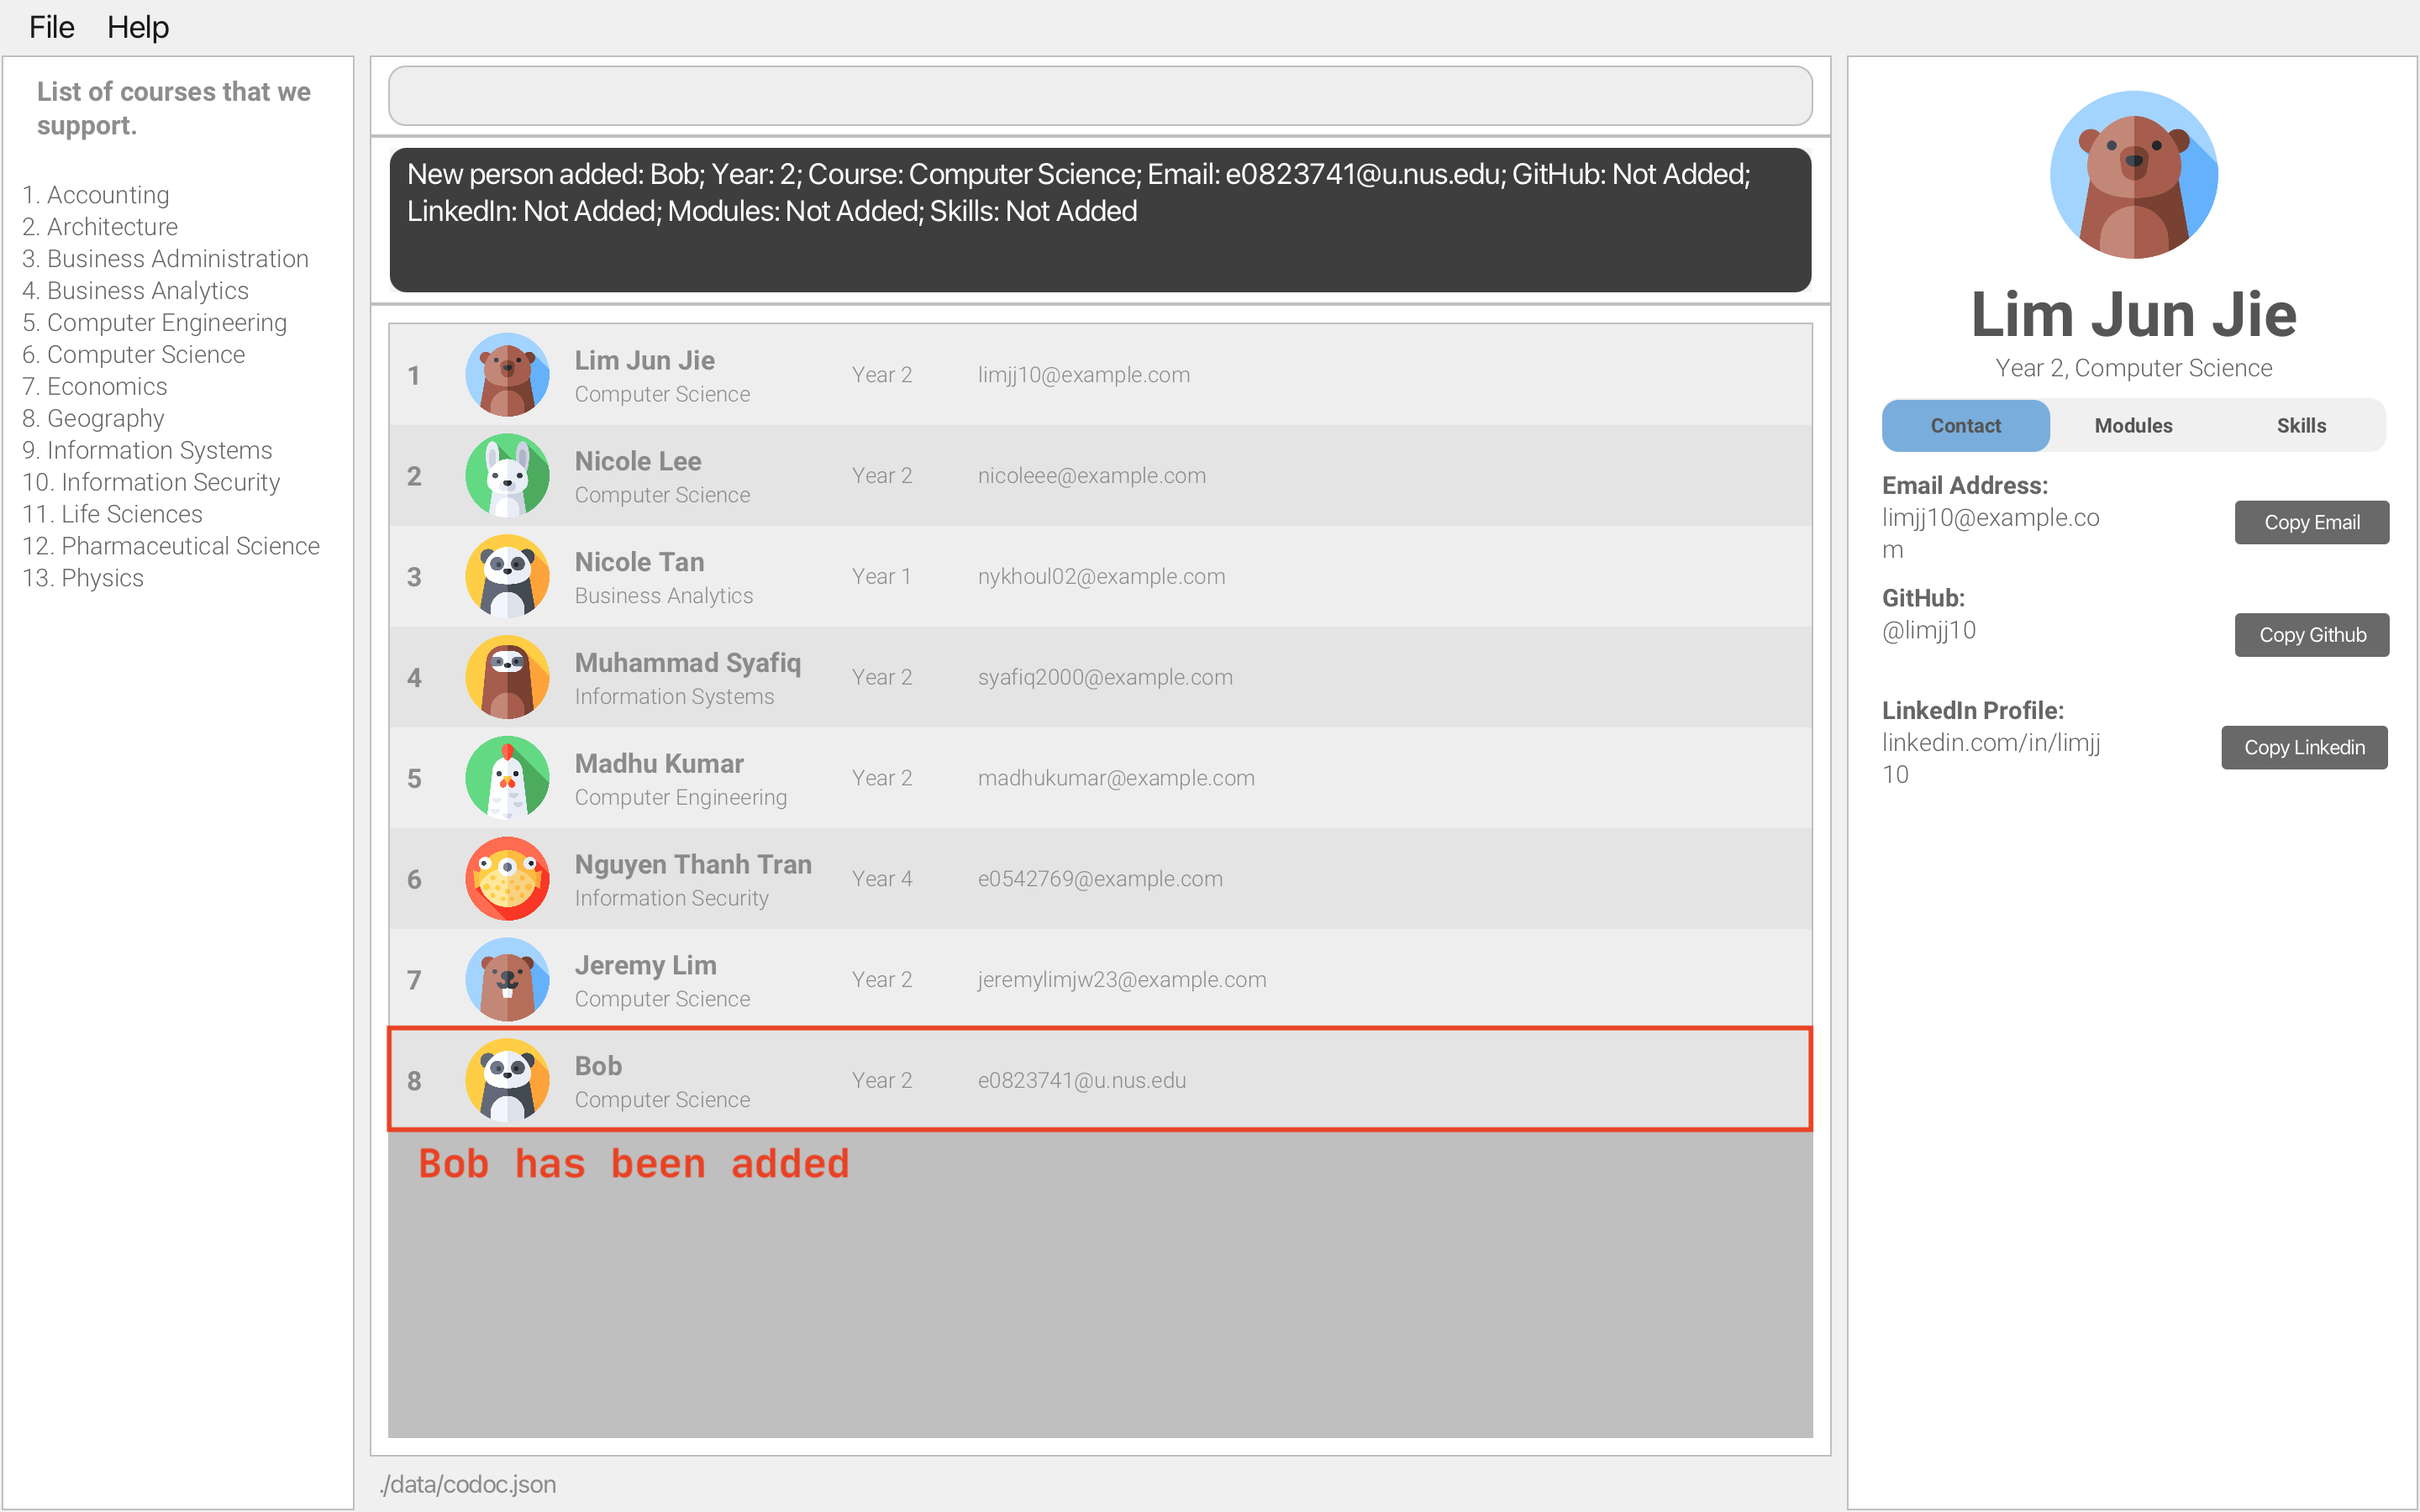
After executing the command, we see that Bob has been added below the list.
Understanding the Command: As you can see, we first specified the
addcommand, followed by the prefixn/and the name that we want to add i.e.Bob. The same goes for the year, course and email. Thisn/andBobpair, is the prefix and parameter pair that occurs frequently in other commands too. Refer to Glossary for more info.
You may have noticed we entered c/6 and wonder why the parameter for course was 6 instead of Computer Science.
To save time typing out the full course and also standardize formatting, we have coded the command so that you just have to type its index as the parameter, which you can refer to the Course List Panel to identify.
If you want to, you can add additional details of the person such as GitHub username, LinkedIn profile URL, modules and skills.
Related: Adding a person: add
2. Viewing a person
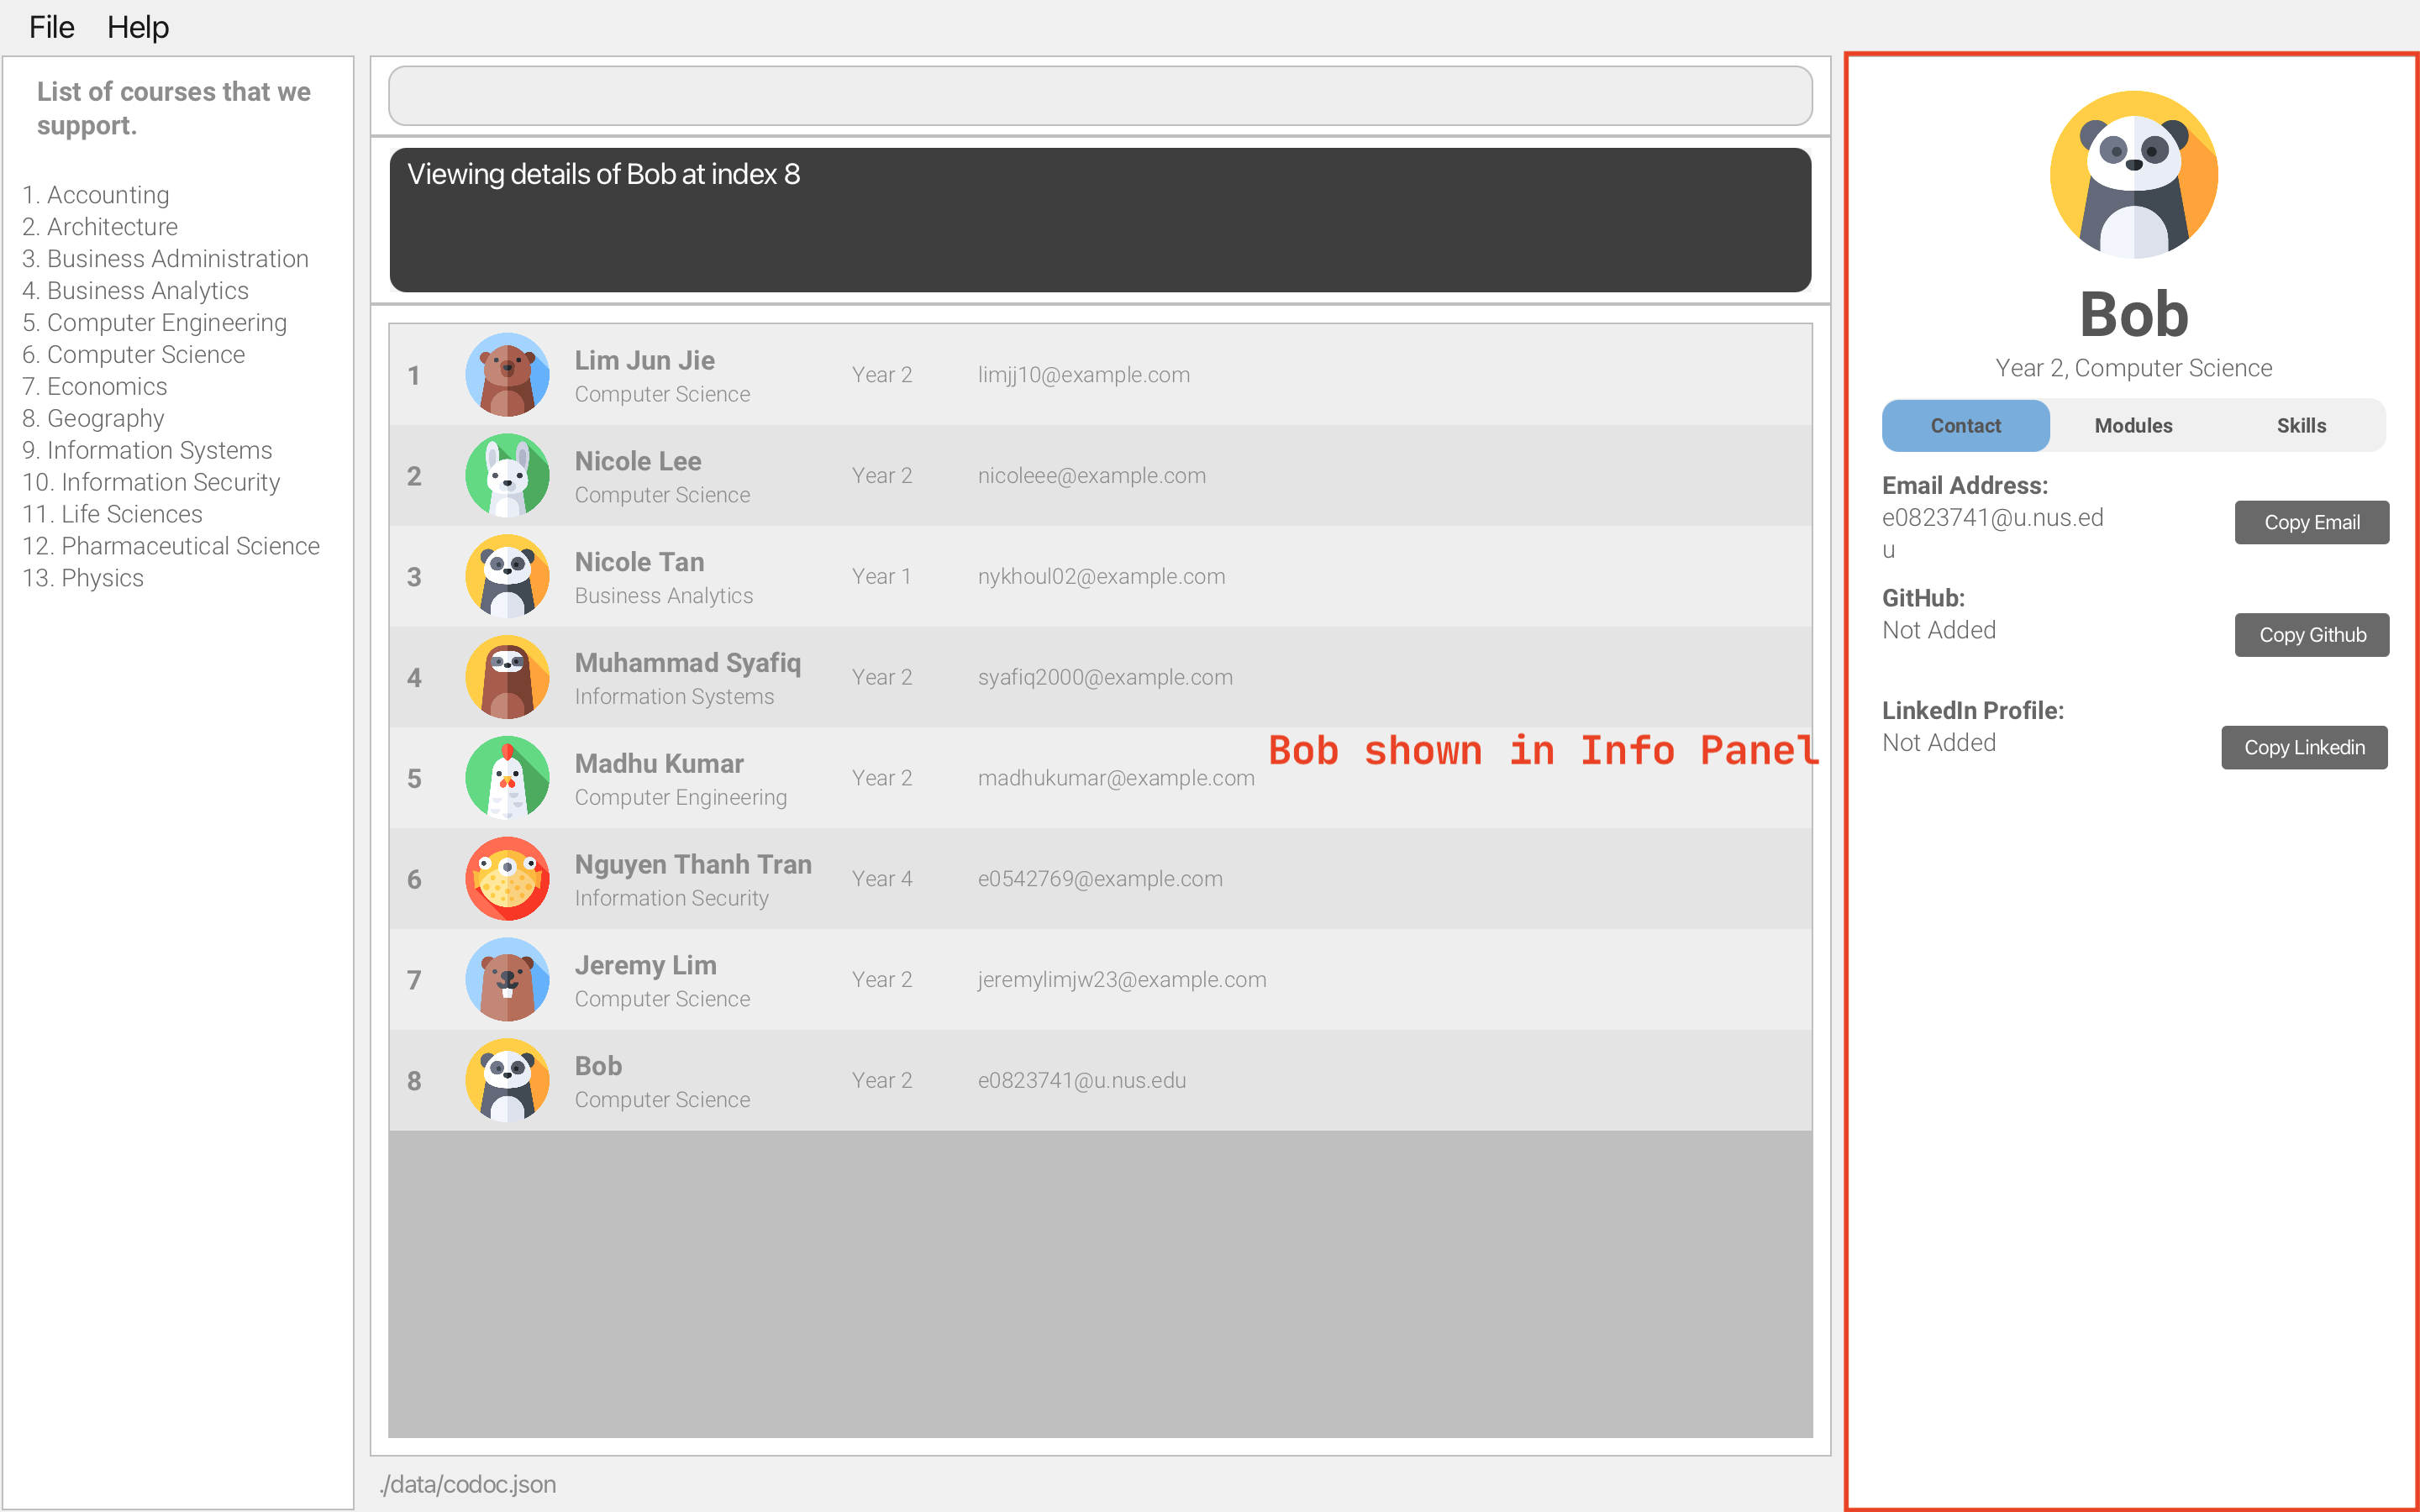
Now that you have added Bob into CoDoc, you can view his details by using the View command. This will load Bob’s details into the Info Panel.
To do so, let’s first identify Bob’s index. From the Person List Panel, we can tell that Bob is
numbered 8 in this example. This is his index. Now enter view 8 into the command box. His contact details will then be shown in the Info Panel.
You may try loading another person’s details by using different index (e.g. view 2).
Remember that we said CoDoc offers more than just a traditional contact management app? So far, you have only viewed the detailed contacts tab, showing basic contact details.
Now let’s try viewing other tabs in Info Panel.
To do so, enter view m in the command box. This will show Bob’s modules taken under detailed modules tab.
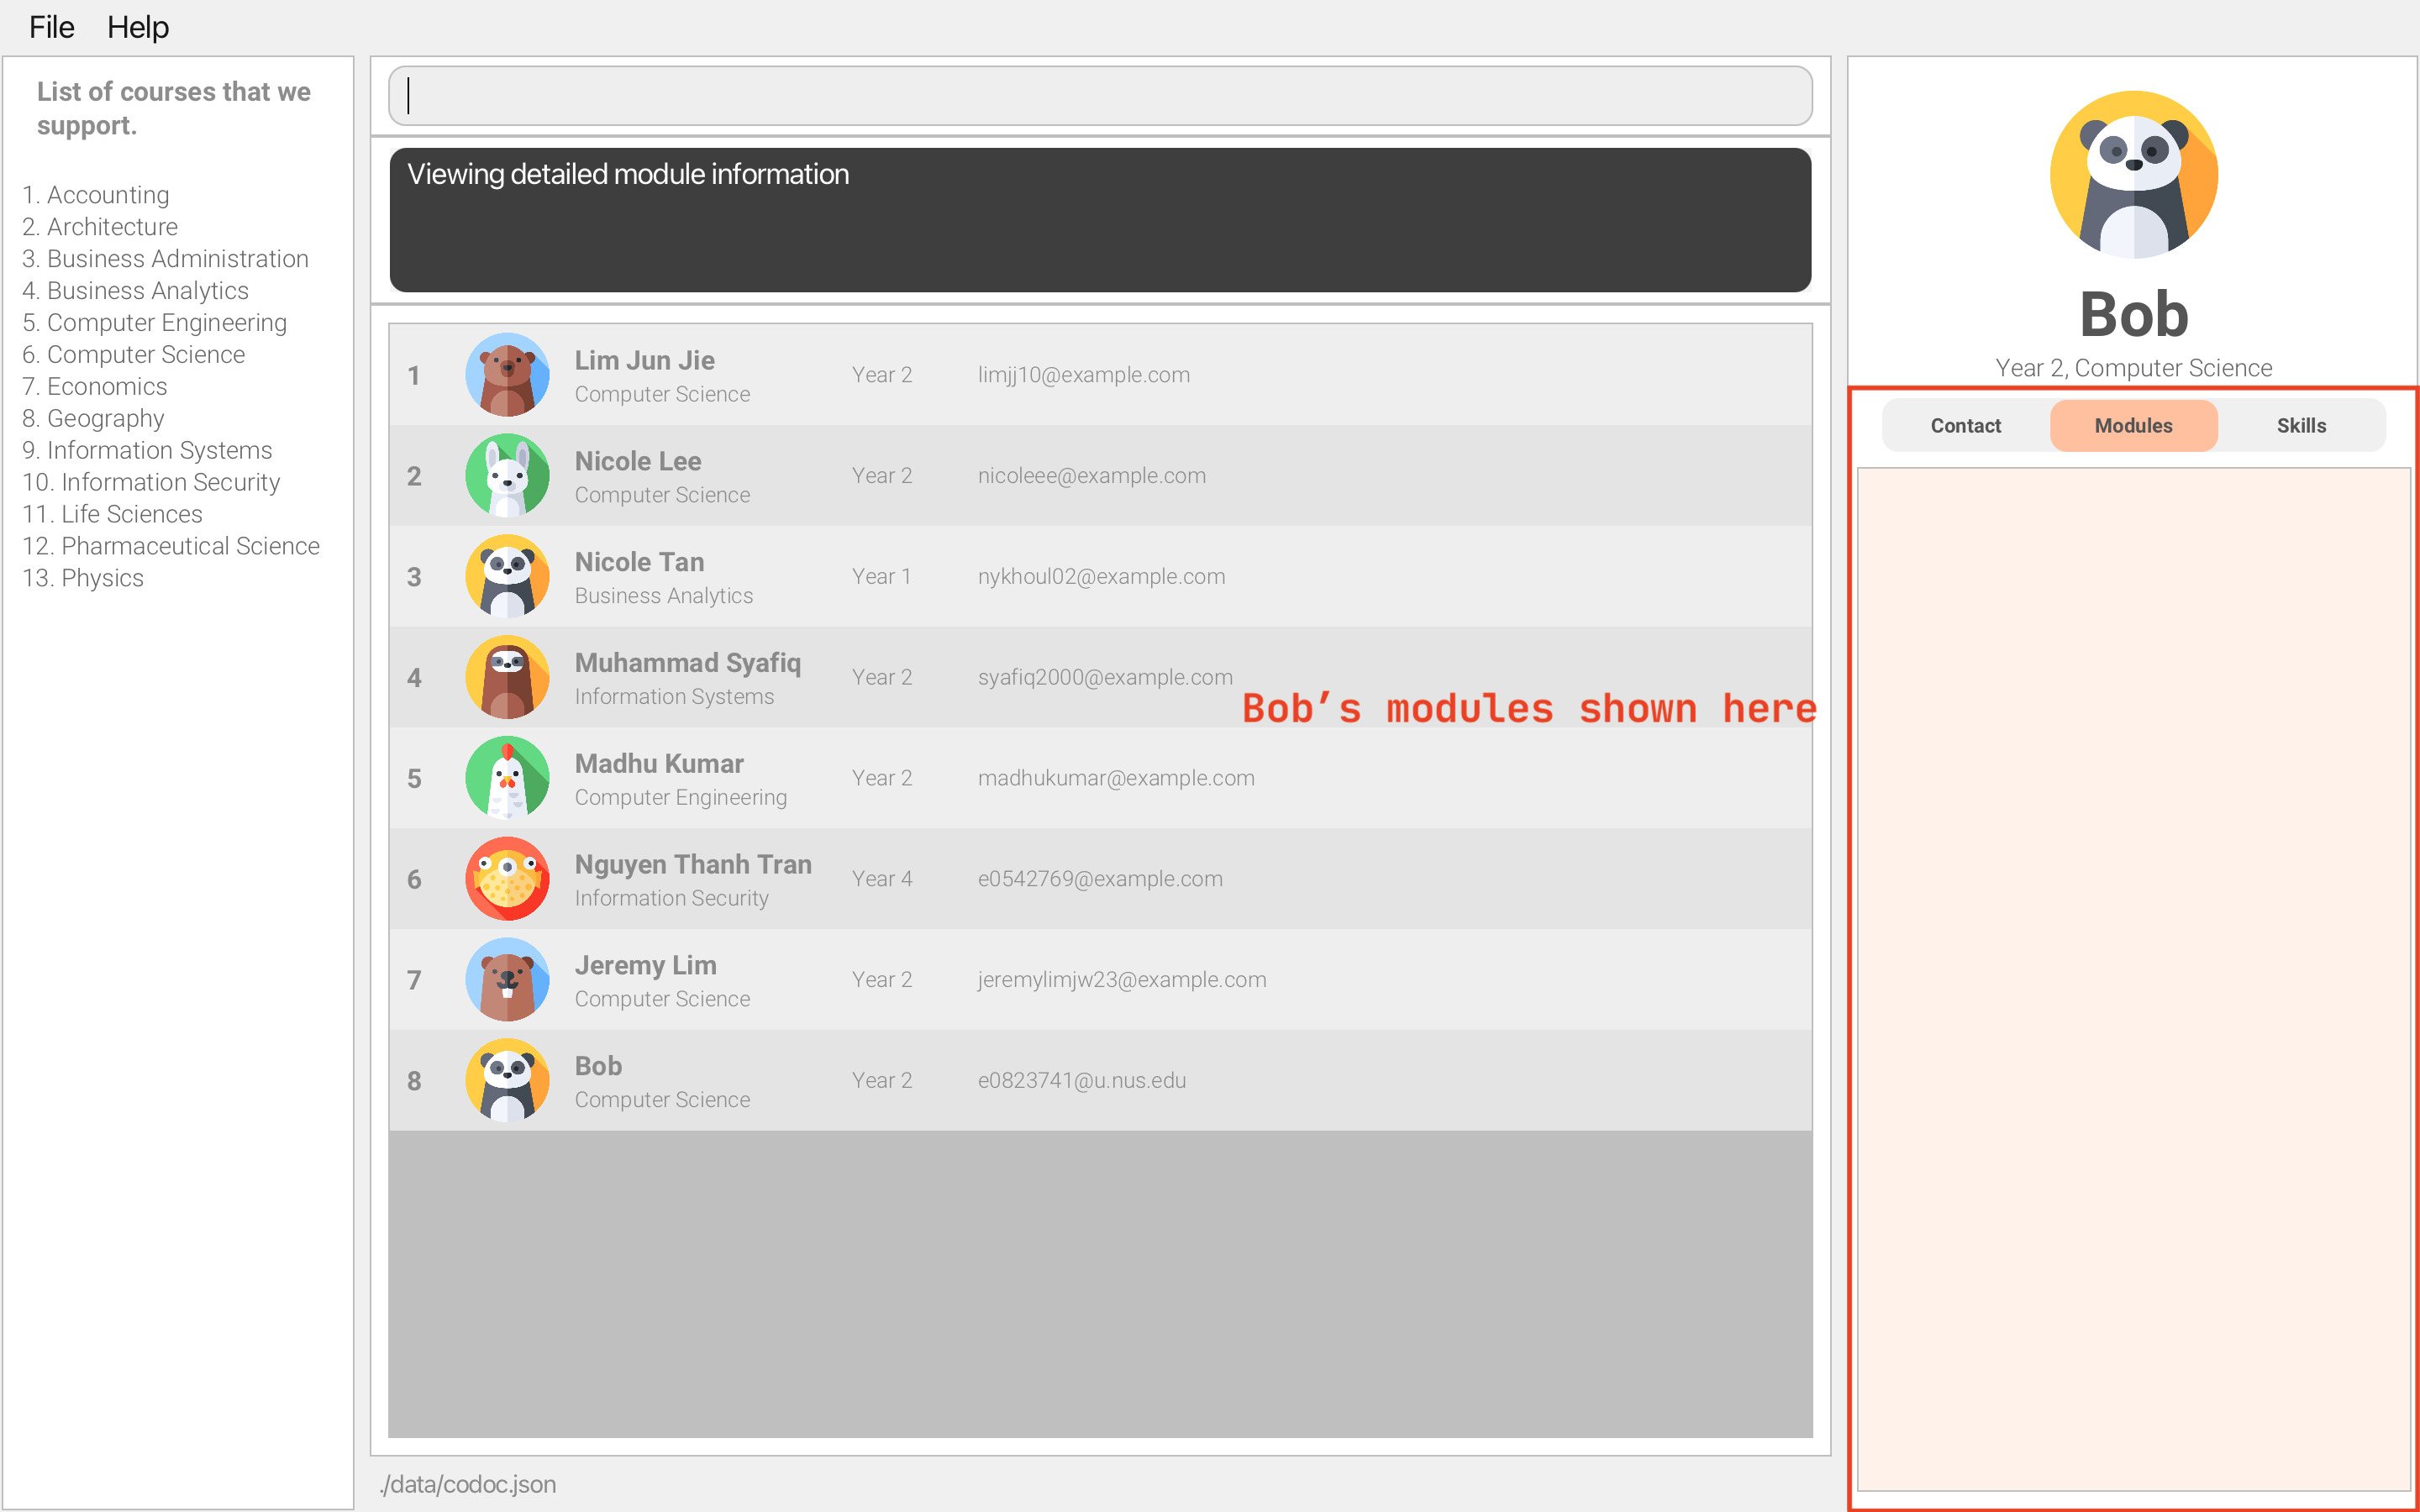
Note that you do not see anything of value, and that is because we have not added any modules Bob has taken so far (don’t worry, we will show how you can add onto this list below).
You can enter view s as well to view Bob’s skills to see a similar empty list, or enter view c to go back to Bob’s
contact information.
Related: Viewing a person/Changing tabs: view
3. Editing a person’s details
To use CoDoc to its fullest potential, you can add Bob’s modules taken or skills possessed to the database.
Let’s say you met Bob while taking CS2101 and CS2103T modules. To update this information in the database, you can use CoDoc’s Edit command.
First make sure that Bob is shown in the right panel using the View command. In this example, we can enter view 8 to
do so.
Why is this step necessary?: Editing only works on the person shown in the info panel. Make sure you are viewing the correct person with the View command (or with a click) before you enter the Edit command.
After you see Bob in the Info Panel, enter edit m/ay2223s2 cs2101 m/ay2223s2 cs2103t in the command box.

You can now see that Bob’s list of modules taken has been updated to contain modules CS2101 and CS2103T
(enter view m if you’re not on the modules tab).
If you want to save the hassle of editing modules only after adding a person, you can include them in the initial Add command to do so.
As the name suggests, Edit command is capable of editing other details of the person such as name, year, GitHub username, etc. Use this to fix your mistakes or update your database as you progress your studies!
Related: Adding a person: add,
Viewing a person: view,
Editing a person: edit
4. Finding a person
You have been using CoDoc for months and have expanded the database greatly. You realize that finding a person in the contacts is getting increasingly difficult and wishes there is an easier way to do so.
That is exactly what CoDoc’s Find command is for! Use this to filter people in the contacts.
Let’s try to find people that are taking/have taken CS2103T. To do so, we have to first clear existing filters if they
have been applied. We can do this by entering list into the command box. This shows us all existing contacts in CoDoc.
Then enter find m/cs2103t. This will make Person List Panel show only the people who have CS2103T in their module
list. On successful execution, you will see something like below.
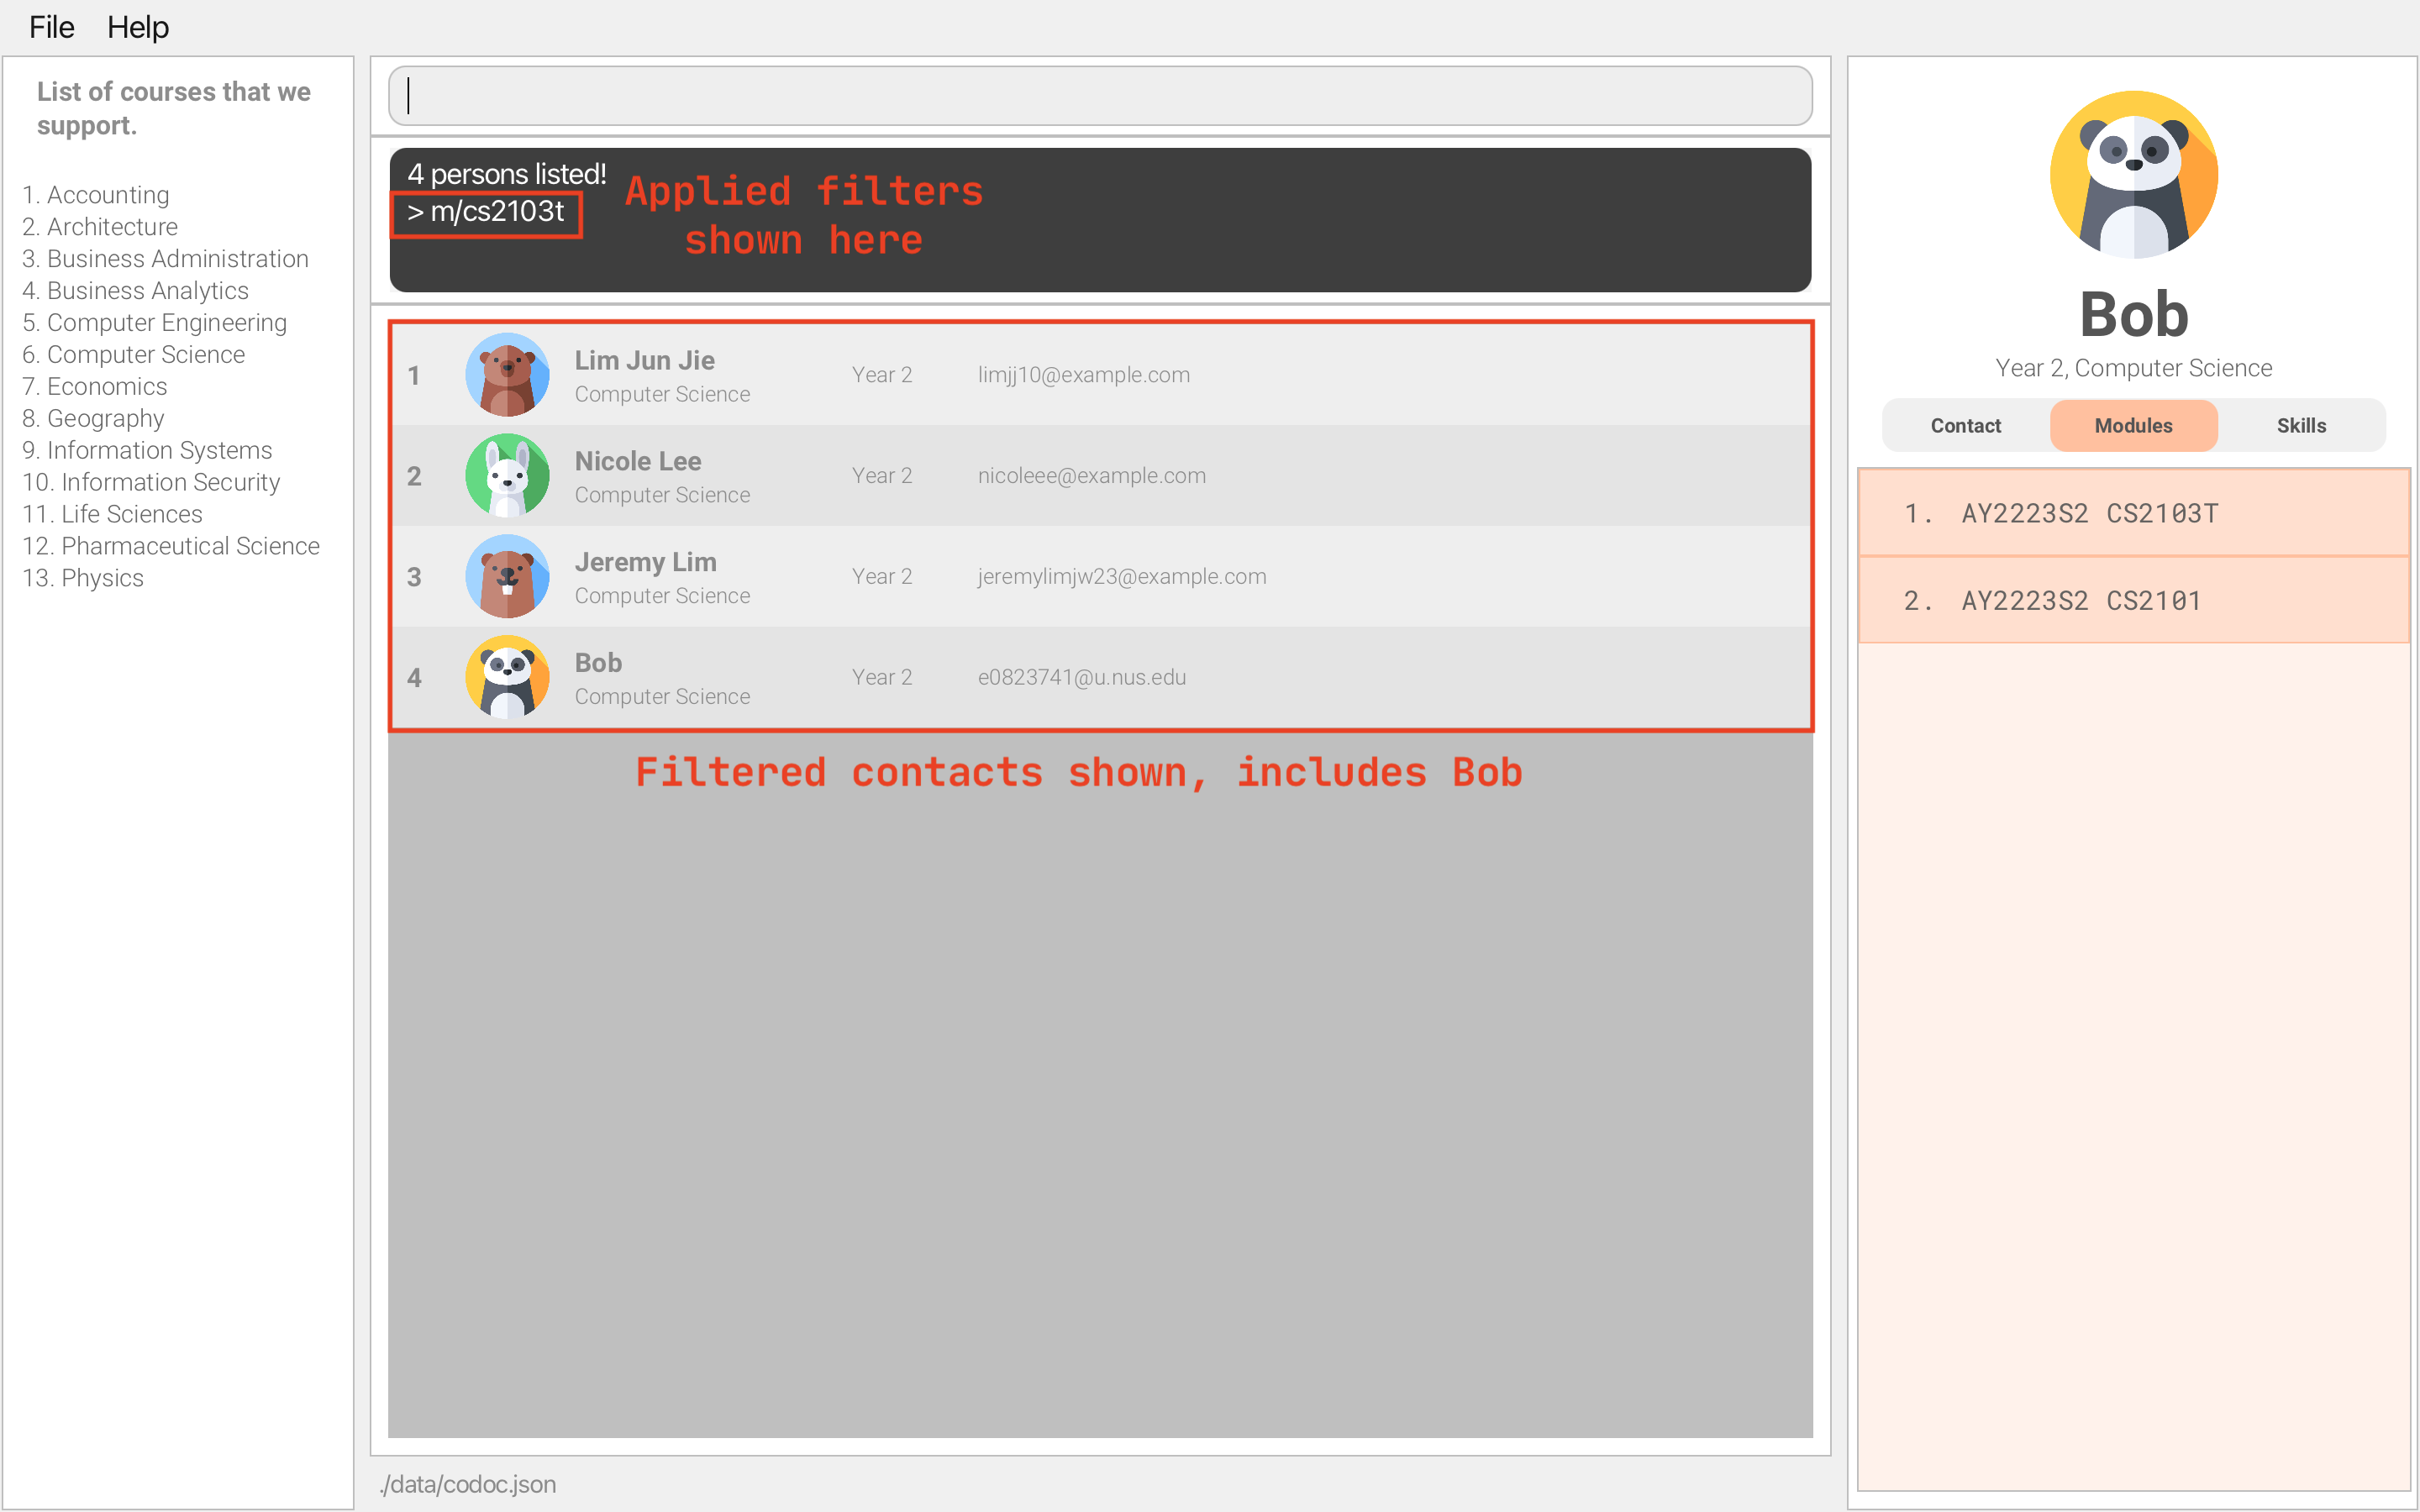
If you tried the examples for previous commands, Bob would be shown as well.
Our find command is pretty powerful; it works for other attributes, like year, skills, etc. and you can find by
multiple attributes. To learn more, look at Finding a person: find.
Related docs: Finding a person: find, Listing all persons/Resetting filters: list
Congrats! You have completed the tutorial 🎉
The pre-existing contacts are just examples for you to mess with. When you are ready, enter clear in the command box to clear all contacts and start off with a fresh database.
clear command, it will not ask twice before wiping your database!
If you need more info on the usage of each command, refer to the relevant sections below.
Scroll back to Table of Contents
Notes about the command format
- Words in
UPPER_CASEare the parameters to be supplied by you.
e.g. inadd n/NAME,NAMEis a parameter which can be used asadd n/John Doe. - Items in square brackets are optional.
e.g.n/NAME [s/SKILL]can be used asn/John Doe s/Pythonor asn/John Doe. - Items with
… after them can be used multiple times including zero times.
e.g.[m/MODULE]…can be used as ` ` (i.e. 0 times),m/AY2223S2 CS2103T,m/AY2122S1 CS1101S m/AY2223S2 CS2103Tetc. - Parameters can be in any order.
e.g. if the command specifiesn/NAME e/EMAIL,e/EMAIL n/NAMEis also acceptable. - If a parameter is expected only once in the command, but you specified it multiple times, only the last occurrence of the parameter will be taken.
e.g. if you specifyg/johnny g/john, onlyg/johnwill be taken. - Extraneous parameters for commands that do not take in parameters (such as
help,list,exitandclear) will be ignored.
e.g. if the command specifieshelp 123, it will be interpreted ashelp.
Scroll back to Table of Contents
Commands
Here is a list of available commands and its details.
1. Viewing help : help
Forgotten the commands? Open the help menu!
help
Scroll back to Table of Contents
2. Adding a person : add
Met a new friend? Add their contact into your CoDoc application!
There are compulsory parameters that must be specified to create the new contact. Once the person has been created, the result display will show a confirmation message and the person can be seen at the bottom of the person list panel.
add n/NAME e/EMAIL y/YEAR c/COURSE_INDEX [OPTIONAL/PARAMETER]...
Compulsory parameters:
- n/NAME (eg.
n/John Doe)- names are case-sensitive and allow duplicates
- e/EMAIL (eg.
e/johndoe123@email.com)- emails are case-insensitive and does not allow duplicates
- y/YEAR (eg.
y/3) - c/COURSE_INDEX (eg.
c/1)
Optional parameters:
- g/GITHUB (eg.
g/johnny)- GitHub’s usernames are case-sensitive and allow duplicates
- l/LINKEDIN (eg.
l/linkedin.com/in/john-doe)- LinkedIn profile URLs are case-sensitive and allow duplicates
- m/MODULE YEAR (eg.
m/AY2223S1 CS2103T,m/AY2122S2 CS2101)- modules are case-insensitive and allow duplicate module codes but does not allow duplicate module year
- s/SKILL (eg.
s/C++,s/Rust)- skills are case-sensitive and does not allow duplicates
Examples:
add n/John Doe e/johnd@example.com y/2 c/3add n/Betsy Crowe e/betsycrowe@example.com y/4 c/1 g/betsy123 l/linkedin.com/in/betsy-123
Scroll back to Table of Contents
3. Viewing a person/Changing tabs : view
Want to look a contact with greater detail? Use view to see more information on the right panel!
If an integer is specified, the person displayed on the right will be the person in the person list that has the same index as the integer given.
If c is specified, the tab on the right will switch to the contact information.
If m is specified, the tab on the right will switch to the modules taken.
If s is specified, the tab on the right will switch to the skills that the person has.
view <PARAMETERS>
Acceptable parameters:
- Any index number within the length of the person list (e.g.
view 2) - c (e.g.
view c) - m (e.g.
view m) - s (e.g.
view s)
view 3 for example, will result in the right panel displaying the module tab of the person at index 3. The same applies for skills.
Examples:
-
view 2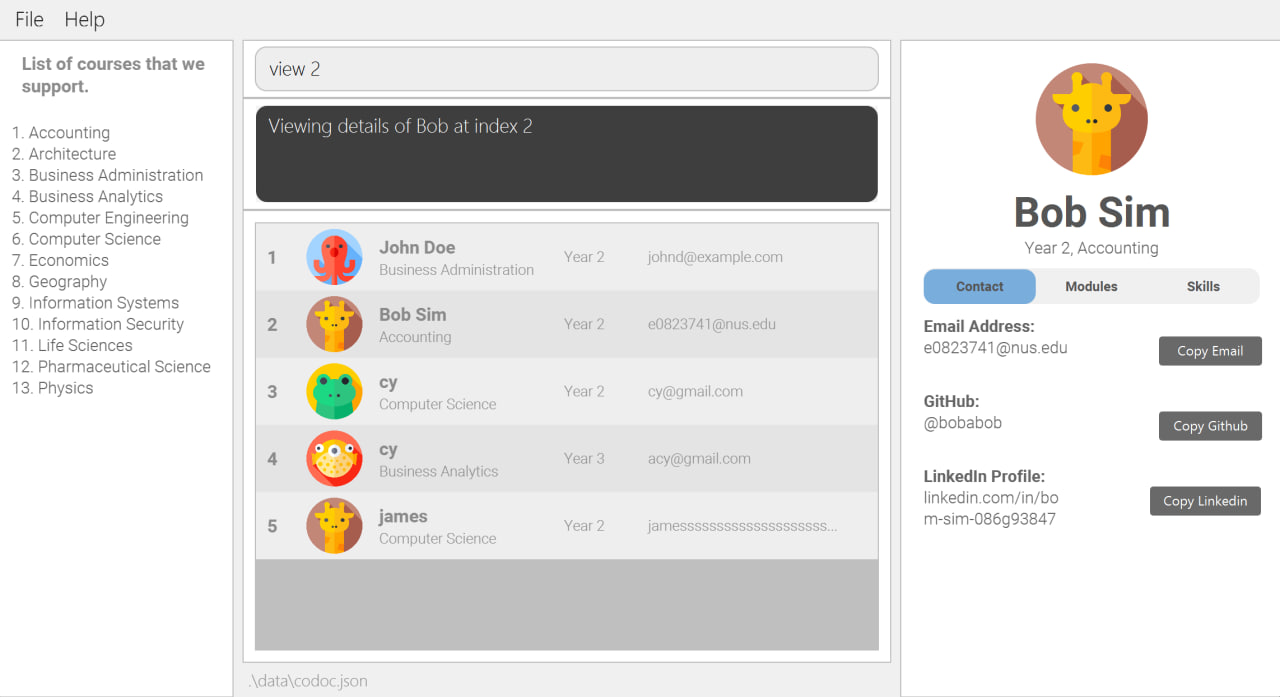
-
view m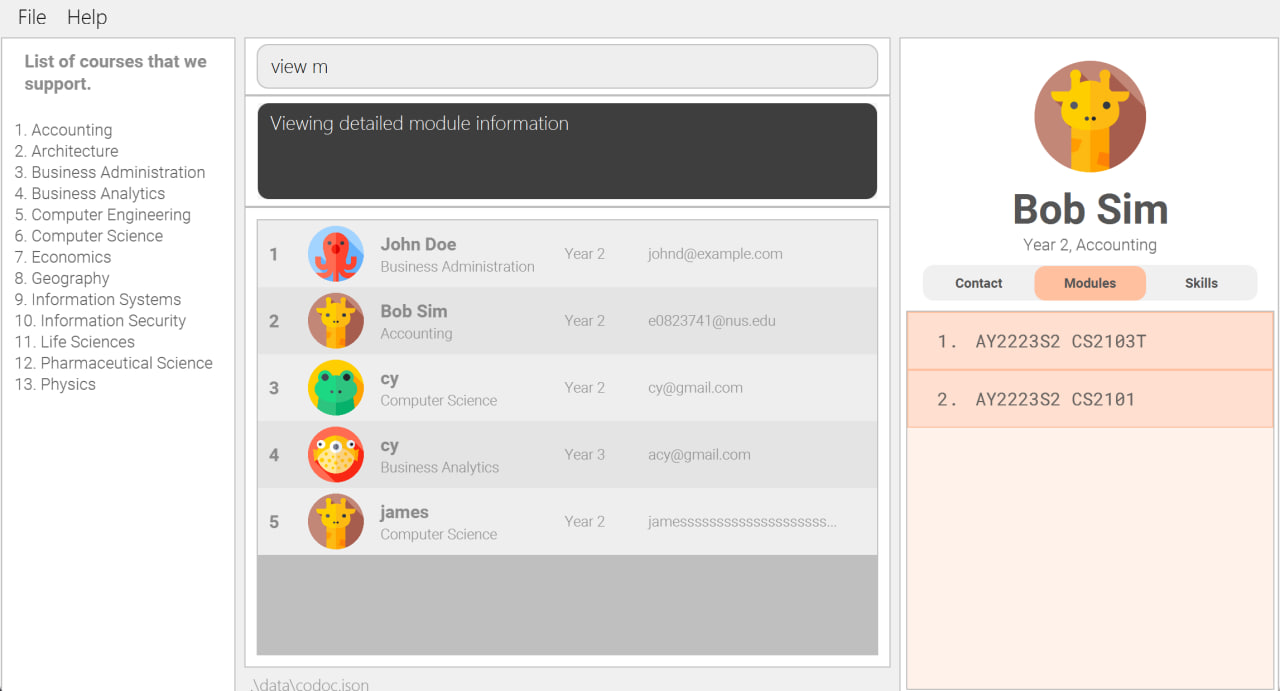
Scroll back to Table of Contents
4. Editing a person : edit
One of your contacts is outdated information? Overwrite them with the edit command!
At least one of the optional fields must be provided.
- You can remove a person’s GitHub by typing
g/without specifying any GitHub username after it - You can remove a person’s LinkedIn by typing
l/without specifying any LinkedIn URL after it - You can remove all the person’s modules by typing
m/without specifying any modules after it - You can remove all the person’s skills by typing
s/without specifying any skills after it
m/ or s/. Use m+/ or s+/ to append information or m-/ or s-/ to delete information instead.
edit [OPTIONAL/PARAMETER]...
Acceptable Parameters
- n/NAME (eg.
edit n/John Doe)- names are case-sensitive and allow duplicates
- e/EMAIL (eg.
edit e/johndoe123@email.com)- emails are case-insensitive and does not allow duplicates
- y/YEAR (eg.
edit y/3) - c/COURSE_INDEX (eg.
edit c/1) - g/GITHUB (eg.
edit g/johnny)- GitHub usernames are case-sensitive and allow duplicates
- l/LINKEDIN (eg.
edit l/linkedin.com/in/john-doe)- LinkedIn profile URLs are case-sensitive and allow duplicates
- m/MODULE YEAR (eg.
edit m/AY2223S1 CS2103T)- m+/MODULE YEAR (eg.
edit m+/AY2223S1 CS2103T m+/AY2021S2 CS1010E) - m-/MODULE YEAR (eg.
edit m-/AY2223S1 CS2103T m-/AY2021S2 CS1010E) - modules are case-insensitive and allow duplicate module codes but does not allow duplicate module year
- m+/MODULE YEAR (eg.
- s/SKILL (eg.
edit s/C++)- s+/SKILL (eg.
edit s+/C++ s+/python) - s-/SKILL (eg.
edit s-/C++ s-/python) - skills are case-sensitive and does not allow duplicates
- s+/SKILL (eg.
m/ or s/ is present in the edit command, this will take precedence over s+/ s-/ m+/ m-/.
Examples:
-
edit g/johndoeee e/johndoeee@example.com: edit the GitHub username and email address of the person to bejohndoeeeandjohndoeeee@example.comrespectively. -
edit m-/ay2223s2 cs3230: displays an error message as the module does not exist. -
edit s/java s+/python: resets the skill list to contain only java—ignorings+/python.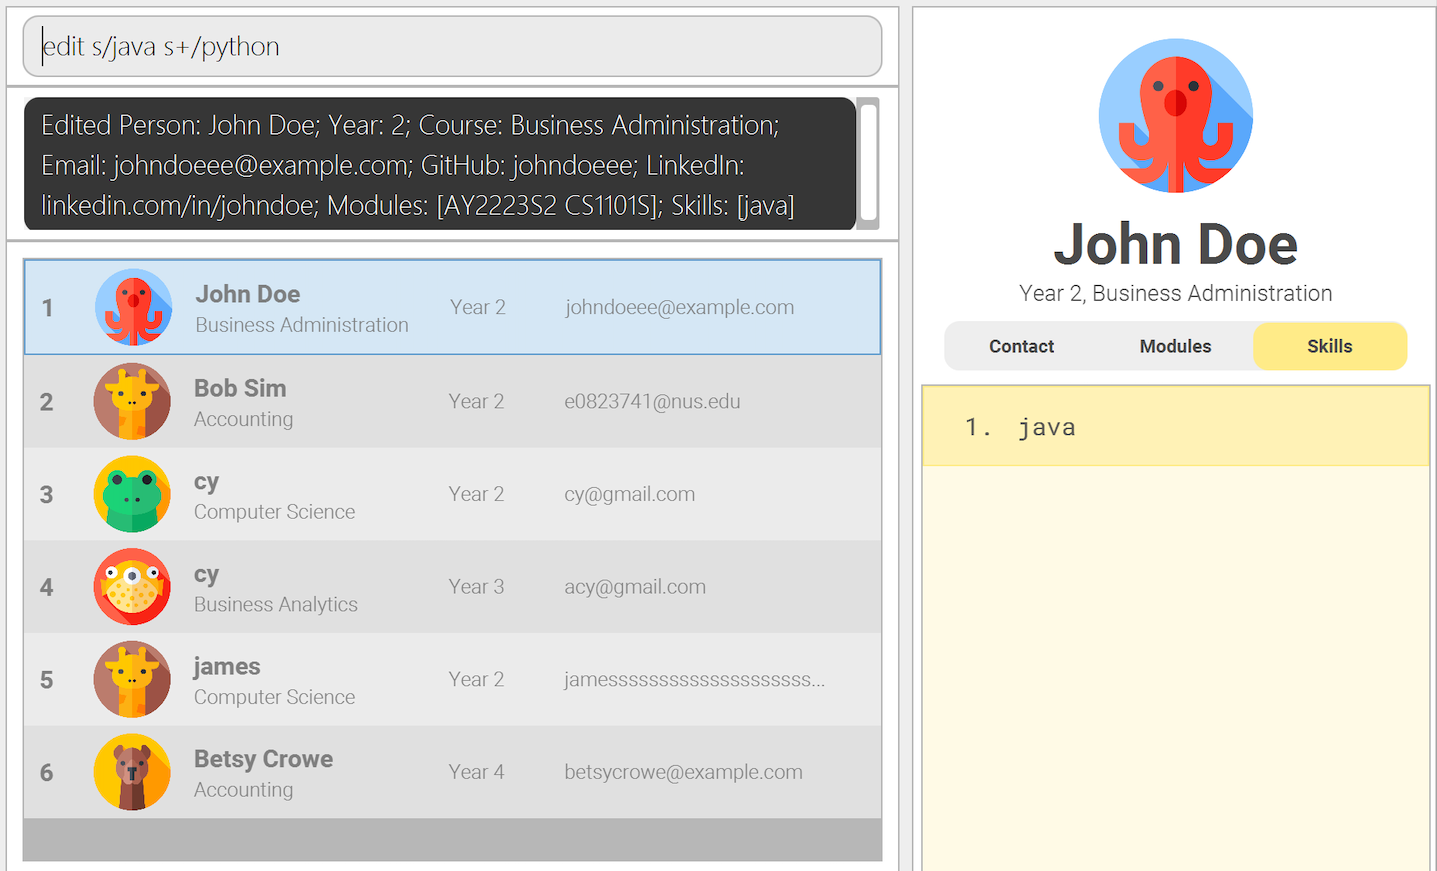
Scroll back to Table of Contents
5. Finding a person : find
Want to find people with certain qualities? Use find command to find people that contain the given constraints!
-
findsupports continuous search by allowing constraints to stack, (refer to example below to find out more) - All constraints applied are shown in Result Display
- To remove all constraints, use
list. - At least one of the optional fields must be provided
- All constraints are case-insensitive
find [OPTIONAL/PARAMETER]...
Acceptable Parameters used as Constraints
- n/NAME
- e.g.
find n/Jo: load all person whose names containJoincludingJohnandJoleen
- e.g.
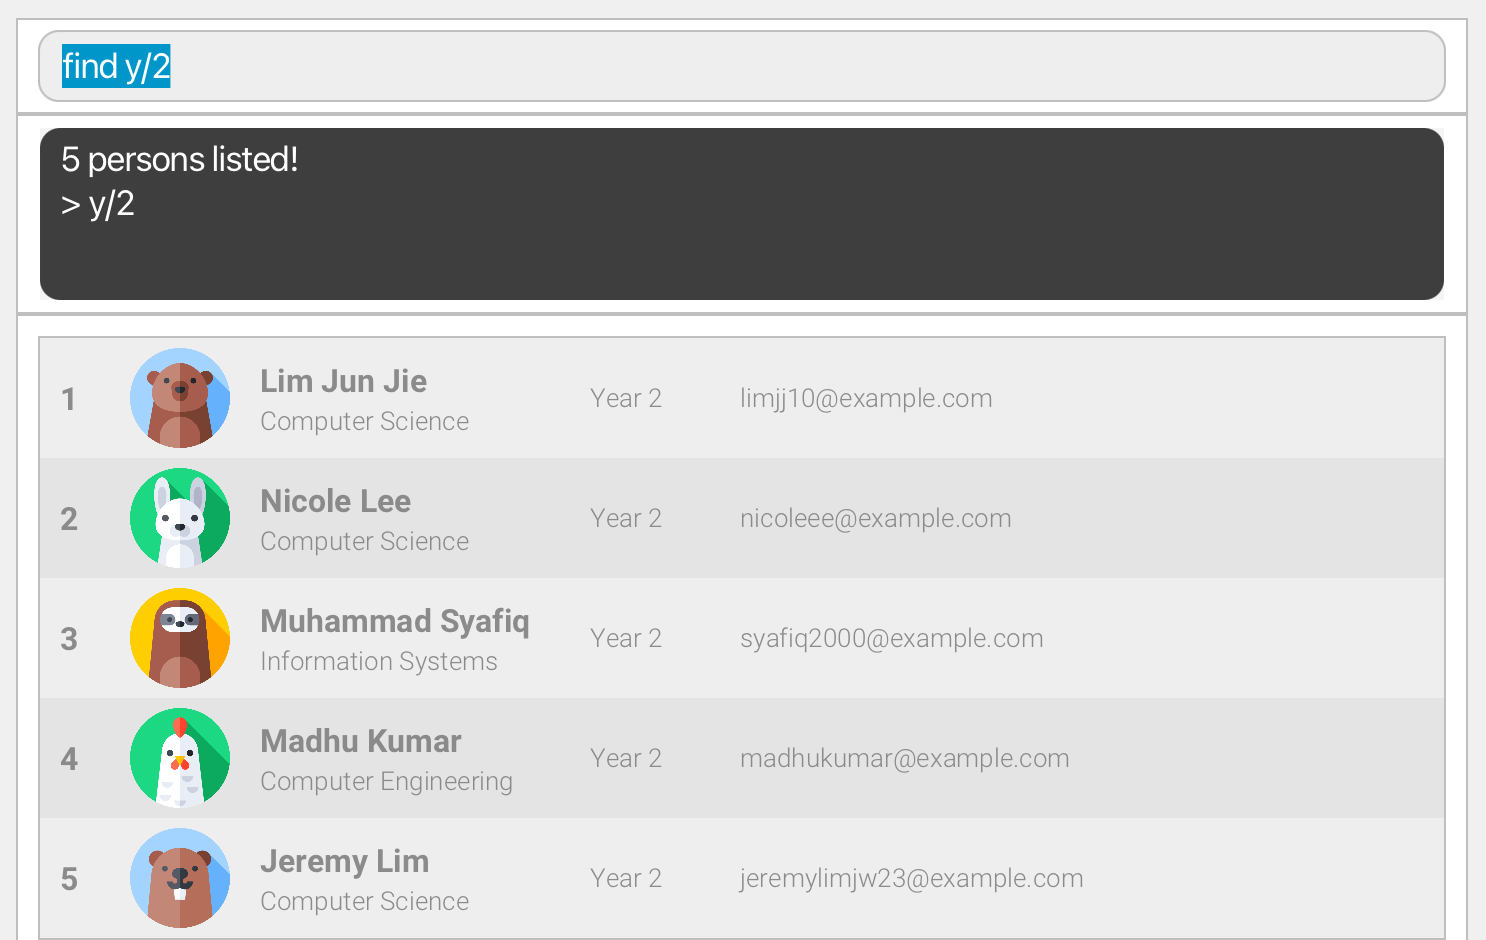
- y/YEAR
- e.g.
find y/2: load all person inyear 2
- e.g.
- c/COURSE
- e.g.
find c/Computer: load all person enrolled in a course withComputerin the name such asComputer EngineeringandComputer Science
-
 Note: This is different from
 addandeditwhich uses c/COURSE_INDEX. To find out why, refer to our faq.
- e.g.
- m/ACADEMIC_YEAR MODULES
- e.g.
find m/AY2223S1 CS2103: load all person withAY2223S1 CS2103in their module list includingAY2223S1 CS2103TandAY2223S1 CS2103R
-
 Tip: You can omit ACADEMIC_YEAR as a constraint. E.g.
 find m/CS2103will load all person withCS2103,CS2103TandCS2103Rregardless of ACADEMIC_YEAR in their module list -
Tip: You can input as many MODULES and ACADEMIC_YEAR MODULES as you want separated by a space. E.g.
find m/cs1101 cs1231 AY2223S1 cs2040 AY2223S2 cs2090 cs3230will load all persons that have taken
>CS1101,CS1231regardless of academic year
>CS2040inAY2223S1
>CS2090,CS3230inAY2223S2
- e.g.
- s/SKILLS
- e.g.
find s/javawill load all persons that containsjavain their skill list such asjavaandjavascript
-
Tip: Similar to m/ACADEMIC_YEAR MODULES you can add as many skills as you want separated by a space.
- e.g.
Example:
- Start by executing
find y/2to find all person from year 2
- Next, execute
find m/cs1101 s/java cto further narrow down the filtered list thereby stacking the constraints
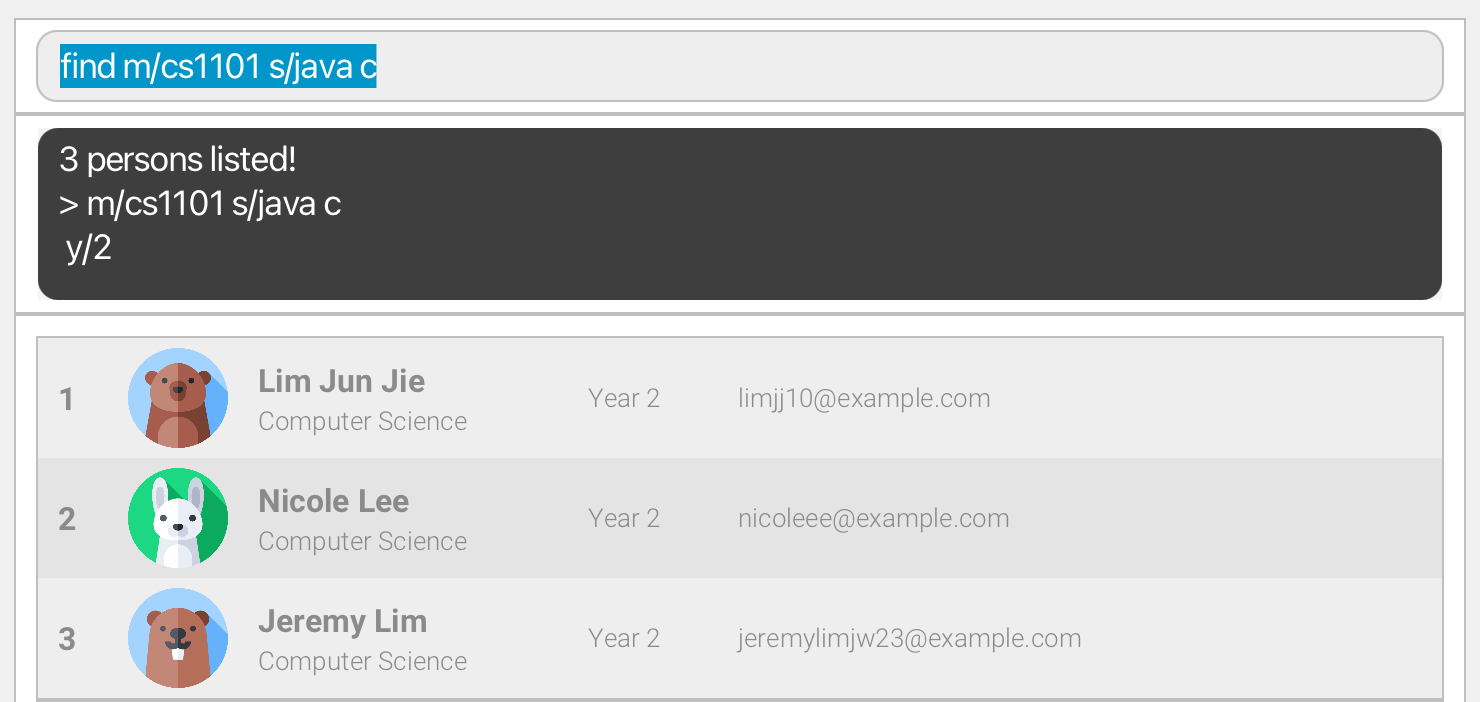
- Finally, use
listto get back the unfiltered list
Scroll back to Table of Contents
6. Listing all persons/Resetting filters : list
Want to see all your contacts? Display everyone stored in Codoc with the list command!
list
find command to shorten the list displayed.
Scroll back to Table of Contents
7. Deleting a person : delete
Want to remove a contact? Delete it at the specified INDEX with the delete command!
delete <INDEX>
Example: delete 1 will delete the current person at index 1
Scroll back to Table of Contents
8. Clearing all entries : clear
Want a fresh start? Use the clear command!
clear
Scroll back to Table of Contents
9. Exiting the program : exit
Want to quit? Use exit command to exit the program!
exit
Scroll back to Table of Contents
Data Management
Q: How do I save my person list?
A: CoDoc automatically saves your person list after every successful add, edit and clear.
Q: How do I transfer my data to another Computer?
A: Install CoDoc on the other computer and overwrite the empty data file it creates with the file that contains the data of your previous CoDoc home folder.
Q: Where is the data file stored?
A: CoDoc data are saved as a JSON file at [JAR file location]/data/codoc.json. Advanced users are welcome to update data directly by editing that data file.
Scroll back to Table of Contents
FAQ
Q: I have added a person with wrong details. How do I change it?
A: Use CoDoc’s Edit command to update the details. If you have also forgotten to add certain
details, you may use the same command to add them (e.g. edit m+/AY2223S2 CS2101 to add module CS2101).
Q: My edit command is not working/changes are not shown.
A: Check that you have entered the command in correct format and the command result shown in the Result Display is not showing any errors.
Q: My edit command is editing the wrong person.
A: Edit command works on the current person you are viewing. Change the viewed person with the View command and view the correct person you want to edit before entering the command.
Q: Why is it find c/COURSE and not c/COURSE_INDEX like add and edit?
A: This is done as it speeds up the adding and editing process since there is no need for you to manually keep track of how courses are inputted—CS vs Computer Science. Also, this avoids clashing acronyms such as CS which could be interpreted as Chinese Studies too.
Q: My find command is not showing the correct list of people.
A: This could be because there is an existing list of filters before you entered the Find command. Try clearing all filters with List command then re-enter the Find command.
Q: I cannot find the course I want to add in the Course List Panel.
A: We are currently working to add as many courses as possible. Meanwhile, you would have to assign any other courses to the person and remember it.
Q: How can I change the profile picture for my contacts?
A: As of right now, profile pictures cannot be edited. They are randomly picked from a pool of 50 avatar icons when a person is added. However, we will be rolling out future updates that will allow you to change the profile pictures.
Scroll back to Table of Contents
Upcoming Features
Automated bulk edits [coming in v2.0]
Details coming soon …
Archiving data files [coming in v2.0]
Details coming soon …
Support for staff [coming in v2.0]
Details coming soon …
Automated year updates [coming in v2.0]
Details coming soon …
Scroll back to Table of Contents
Command Summary
| Actions | Example |
|---|---|
| Add a person | add n/Bob Sim y/2 c/1 e/e0823741@nus.edu g/bobabob l/linkedin.com/in/bom-sim-086g93847 m/ay2223s2 CS2103T m/AY2223S2 cs2101 s/python s/java |
| View contact | view 3 |
| View tab | view c, view m, view s |
| Edit contact in the right panel | edit n/David m+/AY2223S2 CS2109S s-/python |
| Find by attributes | find n/David c/Computer Science m/CS2109S s/java |
| List the full list of contacts | list |
| Delete person at index 3 | delete 3 |
| Clear all persons | clear |
| View user guide and command list | help |
| Exits the application | exit |
Scroll back to Table of Contents
Additional Resources
How to Open CoDoc for Mac
- Create your home folder and place the jar file into it. In this example,
- we create a new folder called CoDoc
- and place our
codoc.jarinto it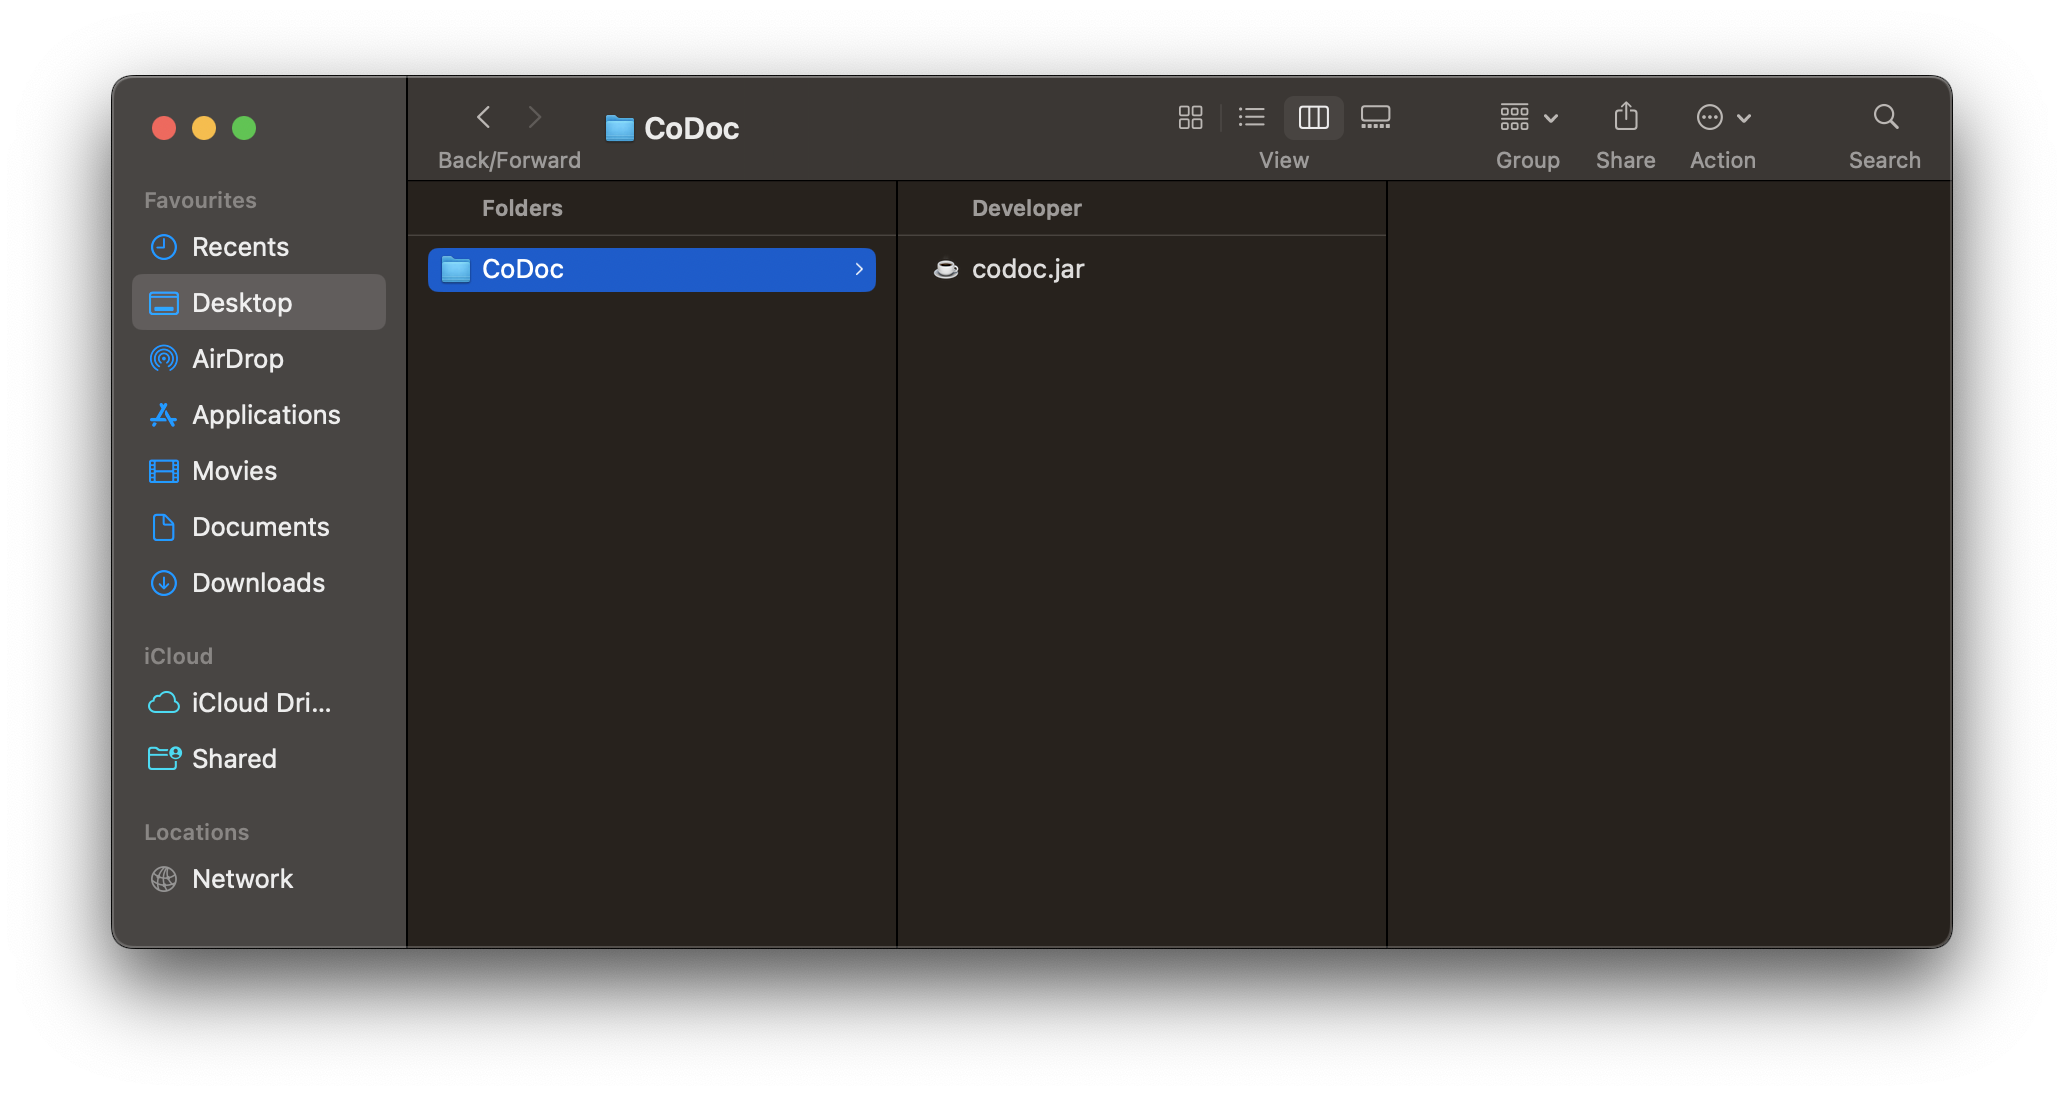
Note: The folder CoDoc is now our home folder.
- Create an empty text file and leave it open for now.
- CMD + Space > type textEdit.app > Enter (to open textEdit)
- CMD + SHIFT + T (to toggle textEdit to plain text)
- Your window should look like the image below
- Right-click on your home folder and navigate to
New Terminal at Folder. This will open a terminal window.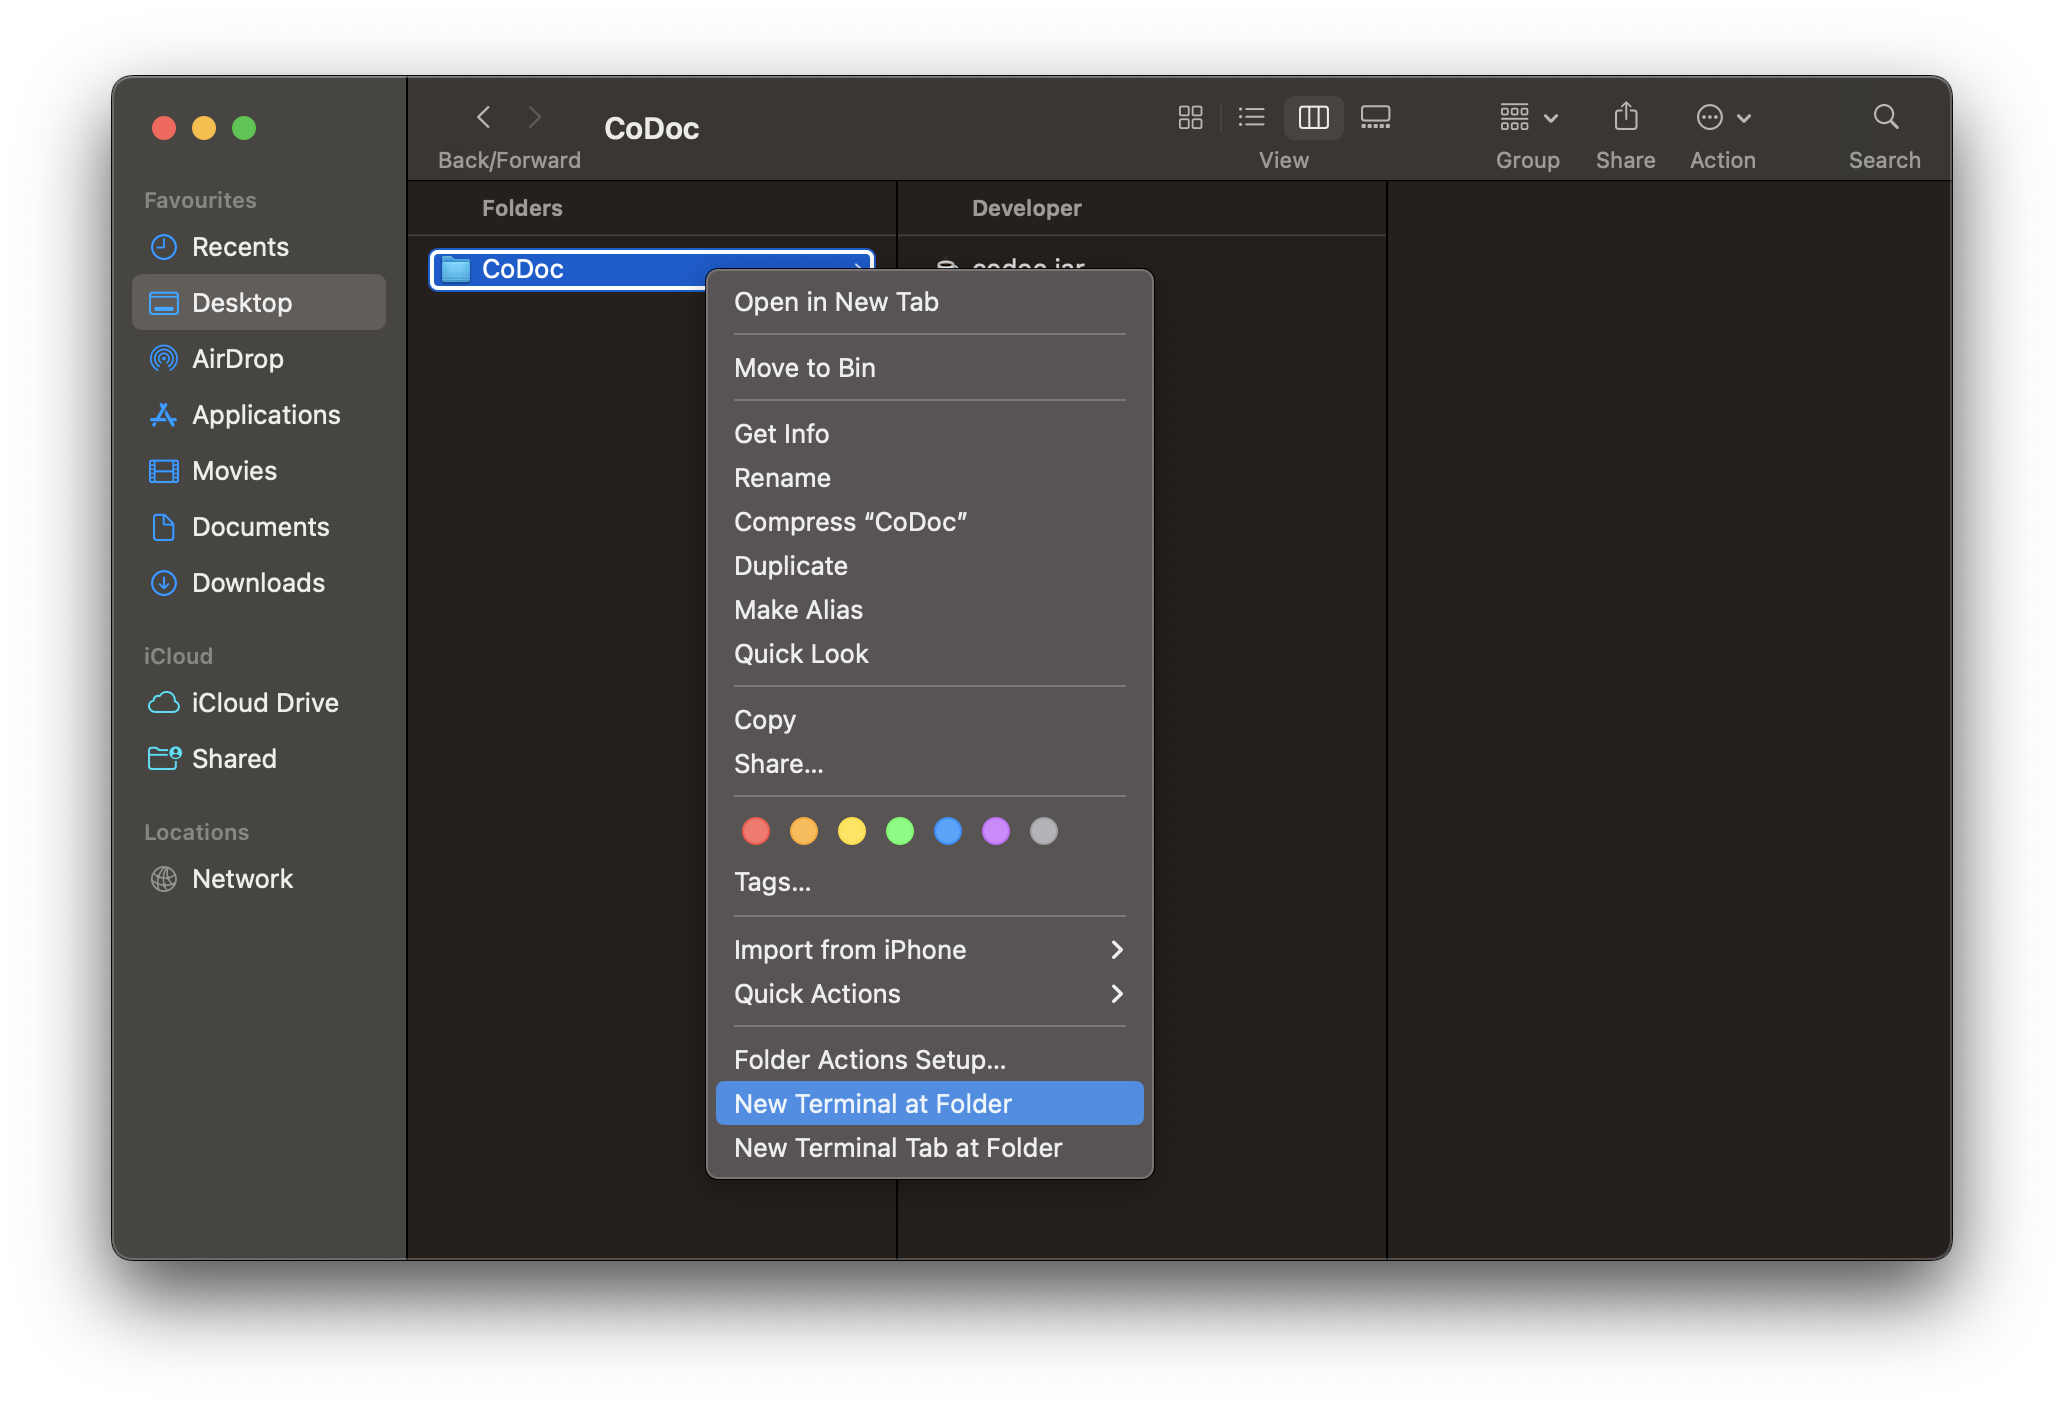
- Then,
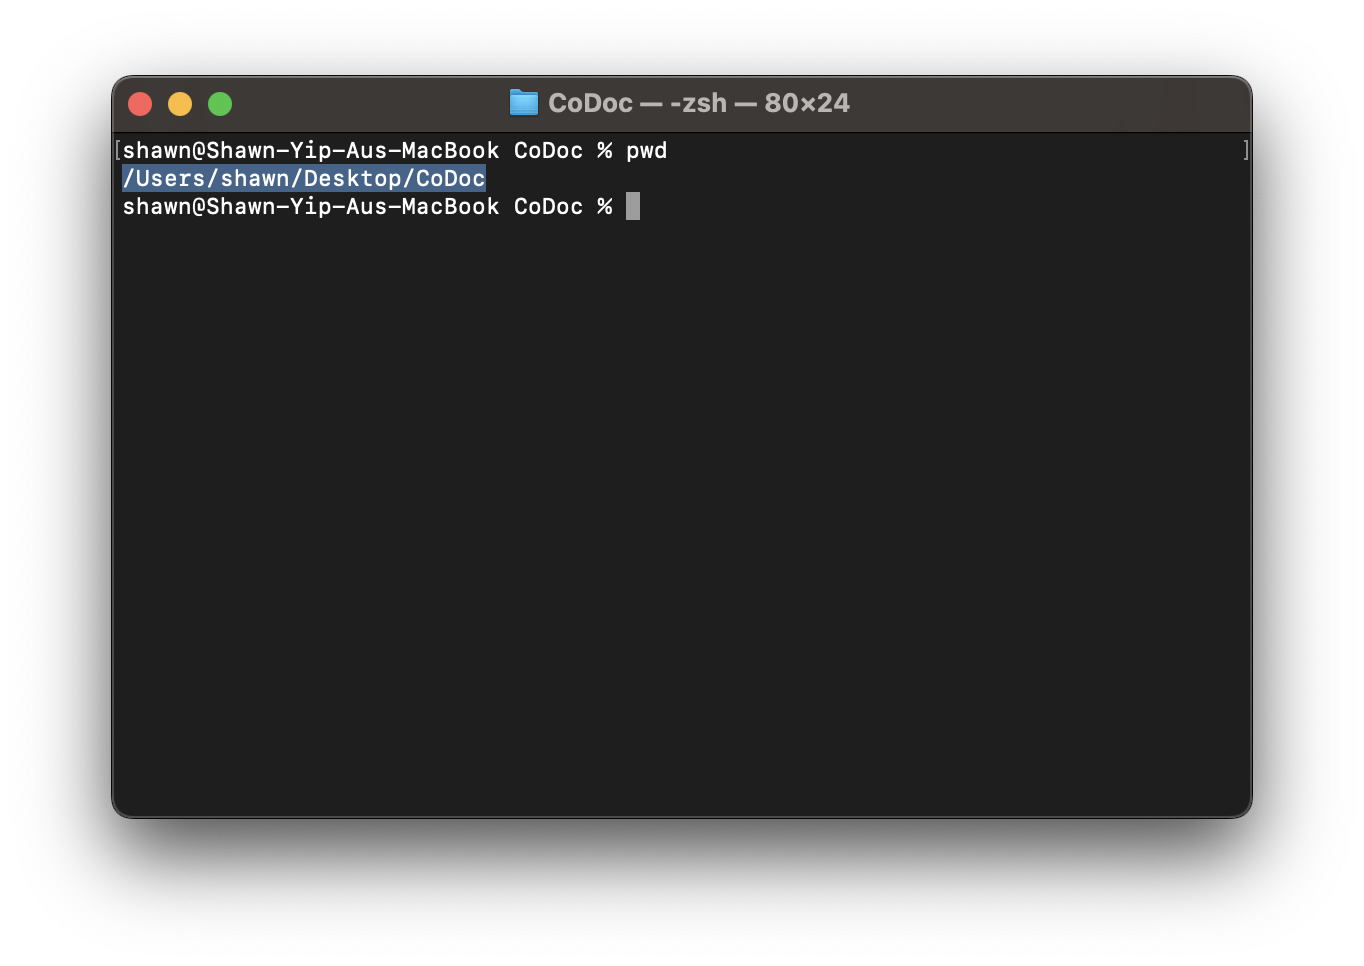
- type
pwd> Enter - copy the output which is yourHomeFolderPath
-
leave this window open too
- type
- Next,
- paste
cd yourHomeFolderPathas well asjava -jar codoc.jar - and save it as a
.commandfile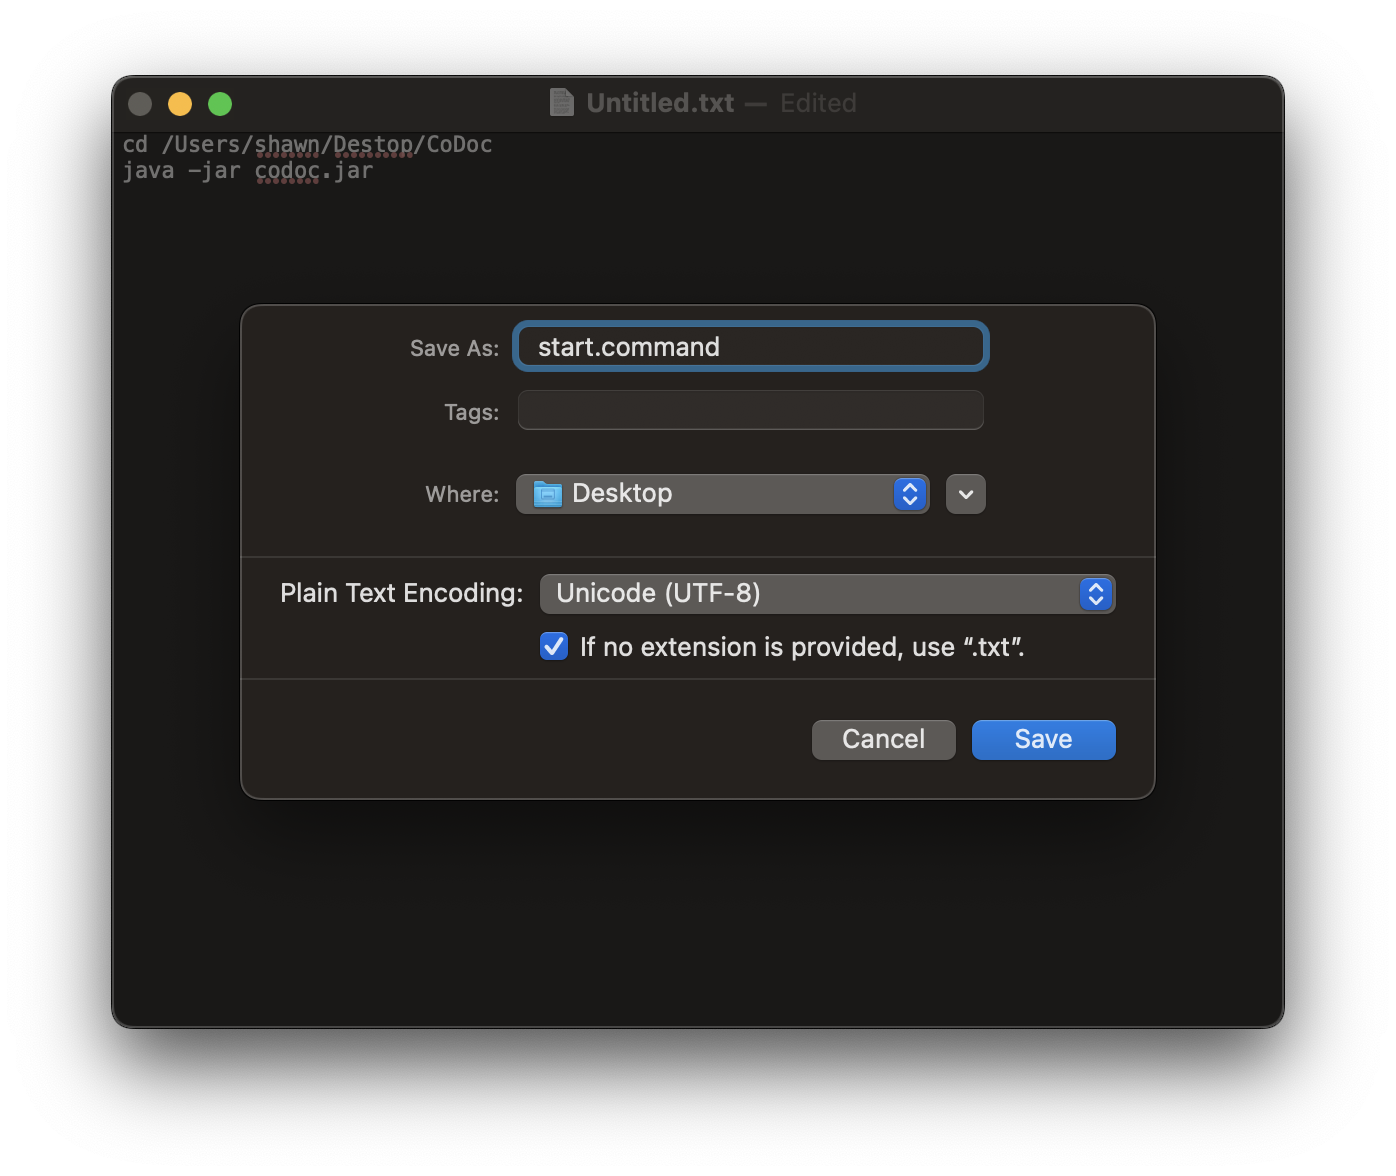
- paste
- Place the newly created
.commandfile into your home folder.
-
Finally, on your opened terminal from step 4, type
chmod 777 start.command> Enter. Note: Replace startwith whatever you name your.commandfile from step 5.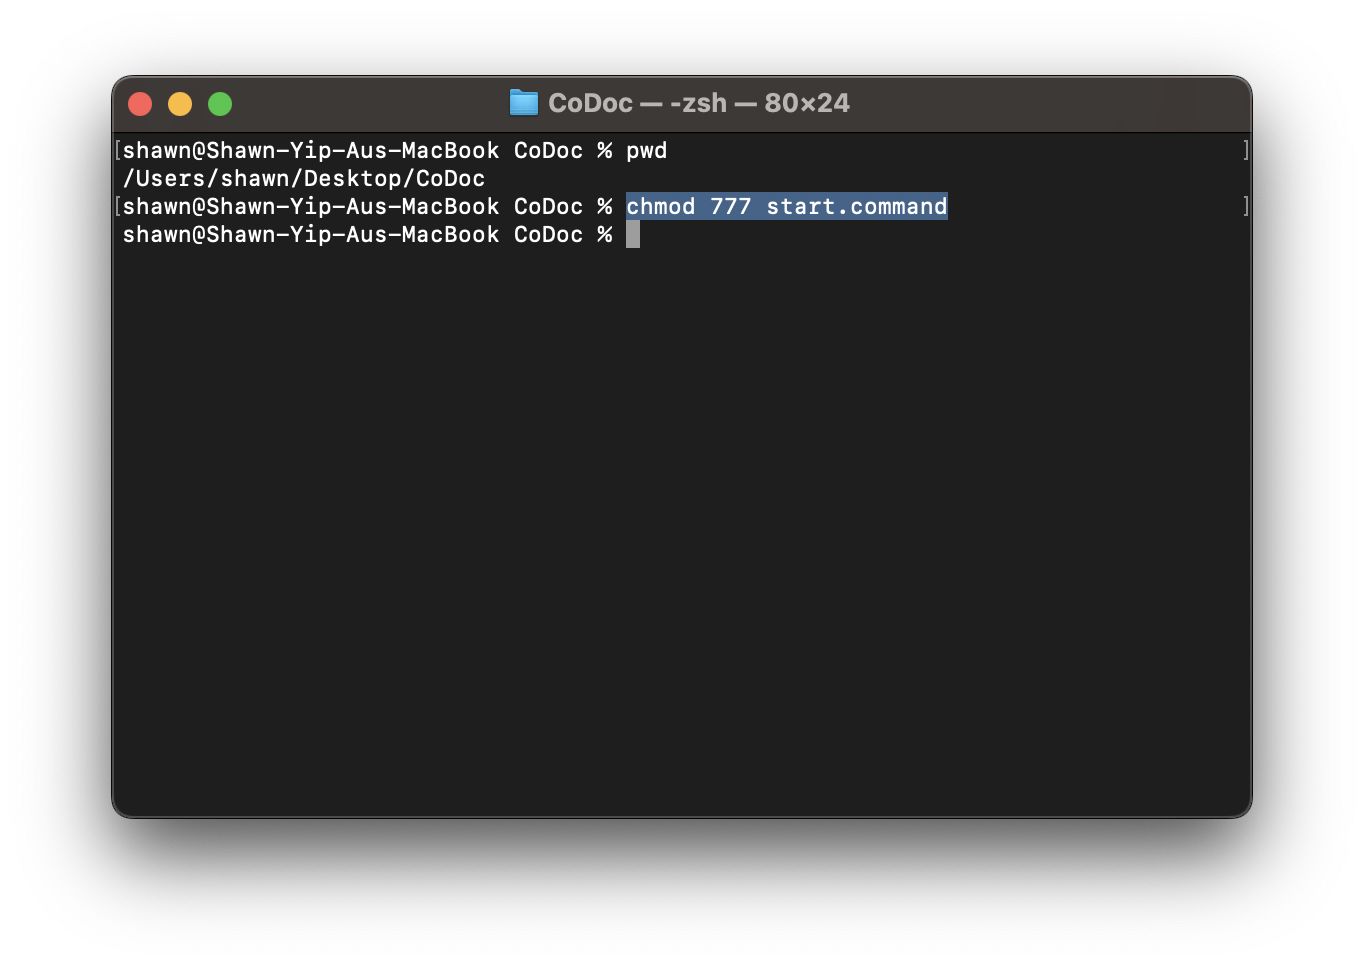
-
You can now double-click on your
.commandfile to open CoDoc. Tip: You can now place the .commandfile anywhere. Caution: If you decide to change the location of home folder, repeat from step 2.
Scroll back to Downloading CoDoc
How to Open CoDoc for Windows
Batch file method for Windows users:
-
Right-click the empty space in the home folder and create new text file.
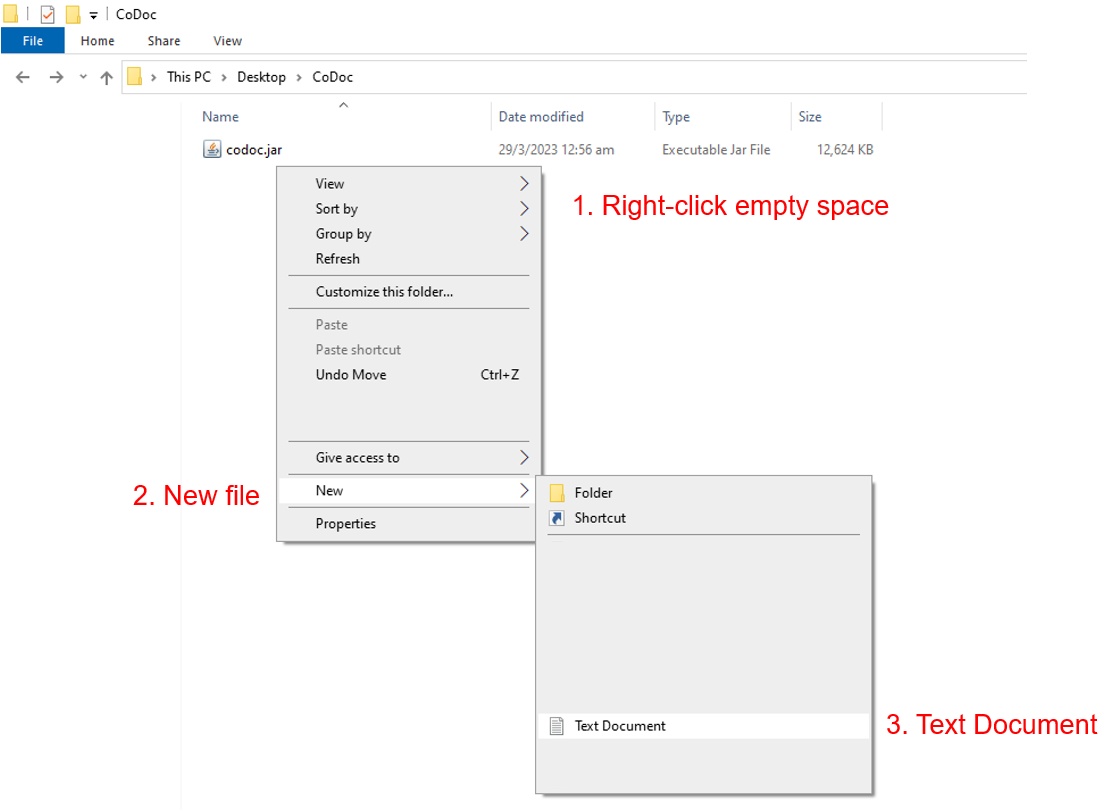
-
Open the text file with any text editor (notepad is fine) and write in
java -jar codoc.jar. Save and close the file.
-
Rename the file to
start.bat. Make sure that file extension gets changed too, if you do not know how to see the file extension, see here.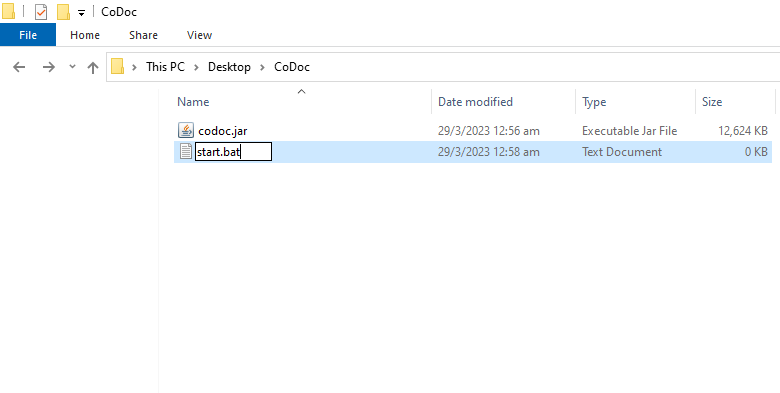 Note: You may see a warning message below. This is because you are converting a text file to a batch file. If so, in the prompt, press "Yes" to continue renaming the file.
-
If done correctly, you should now see a file with an icon similar to below. Double-click the renamed batch file
start.batto launch CoDoc.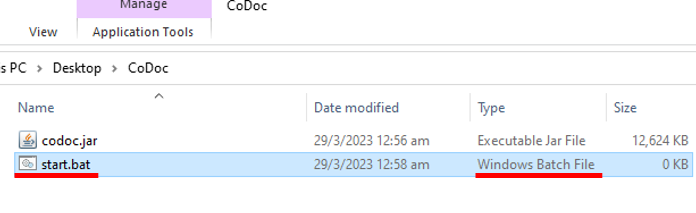
Scroll back to Downloading CoDoc